Instructions
In this article:
Instructions#
How to create a VPN connection between the NGN Cloud and AWS#
To create a VPN connection between NGN Cloud and AWS using dynamic routing via BGP, follow these steps:
In the NGN Cloud, create a temporary customer gateway. To do this, go to the Customer gateways subsection, click Create, select the ipsec.1 type, and an arbitrary IP address.
Create a VPN connection for the customer gateway you created earlier, using the VPC to which you want to establish a VPN connection.
For the VPN connection, you created, view the VGW ASN and Outside IP VGW parameters in the Generic configuration.
In AWS, create a Customer Gateway, select dynamic routing and the same BGP ASN and IP Address parameters as in the previous step. Then delete the VPN connection and customer gateway you created in steps 1 and 2.
In AWS, create a Virtual Private Gateway and specify an ASN. It should be different from the VGW ASN on the NGN Cloud side.
After the VGW is created, attach it to the VPC. To do this, select the created VGW and click Actions > Attach to VPC.
In AWS, create a VPN connection in the Site-to-Site VPN Connections subsection. For convenience, use the following parameters:
Virtual Private Gateway — created in step 5.
Customer Gateway — created in step 4.
Routing Options —
Dynamic.Inside IP CIDR — Internal IP CIDR for the VPN tunnel is selected from the address space
169.254.252.0/22and must have the prefix/30.
The following values will be used as an example:
Inside IP CIDR for Tunnel1:
169.254.252.0/30Inside IP CIDR for Tunnel2:
169.254.252.4/30
If these subnets are already associated with other VPN connections in the NGN Cloud, use different available subnets with the prefix length of
/30from the address space169.254.252.0/22.Pre-Shared Key — you can specify an individual key for each tunnel. If you do not specify a PSK, it will be generated automatically. PSK must be 8 - 64 characters long, can contain alphanumeric characters, underscore or period, and cannot start with 0.
In AWS, for the VPN connection you created, check:
Outside IP Address for each tunnel in the Tunnel Details tab or in the configuration.
Virtual Private Gateway ASN in the configuration.
PSK, if it was generated automatically.
Example of the required parameters from AWS Generic configuration
IPSec Tunnel #1
#1: Internet Key Exchange Configuration
   - Pre-Shared Key           : .F8IuIiCPc73JCbqtqk9RjYsYKZ8yHlD
#3: Tunnel Interface Configuration
Outside IP Addresses:
  - Virtual Private Gateway         : 34.195.175.253
Inside IP Addresses
  - Customer gateway                    : 169.254.252.2/30
  - Virtual Private Gateway             : 169.254.252.1/30
#4: Border Gateway Protocol (BGP) Configuration:
  - Virtual Private  Gateway ASN          : 64512

IPSec Tunnel #2
#1: Internet Key Exchange Configuration
  - Pre-Shared Key           : mkTqMDq8YMOuQ0CR485g0uFB2Uo4P_zj
#3: Tunnel Interface Configuration
Outside IP Addresses:
  - Virtual Private Gateway         : 35.173.85.116
Inside IP Addresses
  - Customer gateway                    : 169.254.252.6/30
  - Virtual Private Gateway             : 169.254.252.5/30
#4: Border Gateway Protocol (BGP) Configuration:
  - Virtual Private  Gateway ASN          : 64512
In the NGN Cloud, create two customer gateways with the following parameters:
Type —
ipsec.1.IP address — <Outside IP Virtual Private Gateway> from AWS Generic configuration.
BGP ASN — <Outside IP Virtual Private Gateway ASN> from AWS Generic configuration.
In NGN Cloud, create two VPN connections, using a web interface or API:
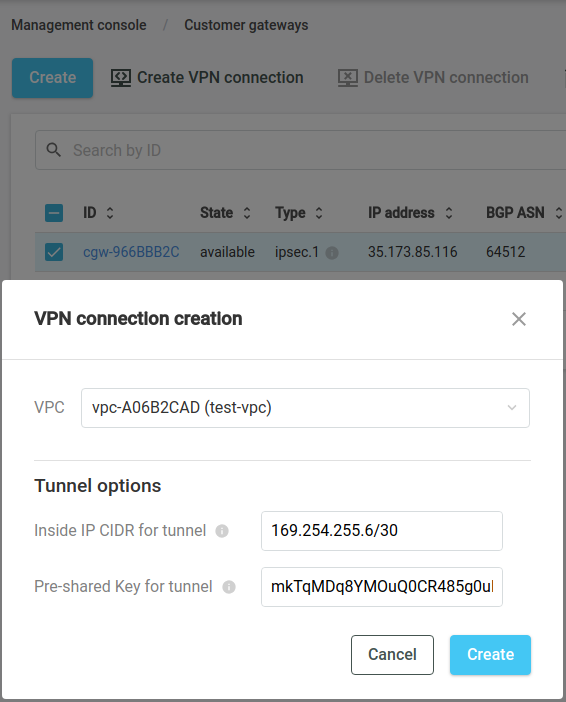
Open the VPN Connections subsection in the web interface, and click Create. In the dialog window, enter the customer gateway you created and Inside IP CIDR for the Tunnel and Pre-shared Key for the Tunnel in the Tunnel parameters step, where Inside IP CIDR for the Tunnel corresponds to Inside IP Customer gateway from the AWS Generic configuration.

Note also that a VPN connection can be created in the Customer Gateways subsection by clicking Create VPN Connection or in the VPN Connections tab of a particular customer gateway page:
To create a VPN connection via API, you may use c2-client or AWS CLI:
c2-ec2 CreateVPNConnection CustomerGatewayId <cgw_id> Type <type> VPNGatewayId <vgw_id> Options.TunnelOptions.0.PreSharedKey <pre_shared_key> Options.TunnelOptions.0.TunnelInsideCidr <cidr,addr>
aws <...> create-VPN-connection --customer-gateway-id <cgw_id> --type <type> --VPN-gateway-id <vgw_id> --options "{\"TunnelOptions\": [{\"TunnelInsideCidr\": \"<cidr, addr>\", \"PreSharedKey\": \"<pre_shared_key>\"}]}"
In this case:
<vgw_id>corresponds to the VPC to which a VPN connection has to be established.For convenience,
vgw_idis identical tovpc_id(vgw-<...>/vpc-<...>). You can also use the DescribeVpnGateways method to getvgw_id.
<pre_shared_key>— PSK that was specified or automatically generated in AWS.<cidr,addr>— specify the second address from the/30``subnet, since AWS uses the first address from the ``/30``subnet, for example, ``169.254.255.2/30for the first VPN connection and169.254.255.6/30for the second one.
Example
c2-ec2 CreateVPNConnection CustomerGatewayId cgw-6525809R Type ipsec.1 VPNGatewayId vgw-B3K13902 Options.TunnelOptions.0.PreSharedKey .F8IuIiCPc73JCbqtqk9RjYsYKZ8yHlD Options.TunnelOptions.0.TunnelInsideCidr 169.254.255.2/30
aws --profile <your_profile> --endpoint-url https://ec2.cloud.ngn.com.tr:443 create-VPN-connection --customer-gateway-id cgw-845F0C92 --type ipsec.1 --VPN-gateway-id vgw-B3K13902 --options "{\"TunnelOptions\": [{\"TunnelInsideCidr\": \"169.254.255.6/30\", \"PreSharedKey\": \"mkTqMDq8YMOuQ0CR485g0uFB2Uo4P_zj\"}]}"
Note that <vgw_id>` will be the same for the first and second VPN connections, since they are created in one and the same VPC.
In AWS, make sure that Route Propagation is enabled in Route Tables. This functionality allows you to automatically add a route to CIDR VPC of NGN Cloud to the routing table.
As of now, a static route has a higher priority in the NGN Cloud. Therefore, to correctly route VPN connections dynamically, remove the default entry
0.0.0.0/0from the routing table.In AWS on the tab Site-to-Site VPN Connections > Tunnel Details, verify that the tunnels have been successfully established and obtained routes.
Note
You can change BGP ASN for VGW on the NGN Cloud side if necessary. To do this, contact support.