Instructions
In this article:
Instructions#
Migrate a Virtual Machine to the NGN Cloud#
NGN Cloud uses KVM hypervisor. So, before migration, please make sure that Virtio drivers are installed, and OS supports a Virtio controller. An instance can still be launched in NGN Cloud if the drivers are missing. However, its disk and network performance will be not as good as it could be with the drivers installed.
Attention
OS images that use UEFI mode cannot be imported.
If your OS supports a Virtio controller, install Virtio disk and network drivers.
Export volumes from your virtualization platform.
Important
NGN Cloud supports volumes in VMDK format that you can obtain by exporting VMs to OVF/OVA format using VMware vSphere tools. To learn how to prepare files in VMDK format, read the official VMware documentation
Convert volume snapshots to Qcow2 format using qemu-img utility. Below is a sample command for conversion from VMDK format:
qemu-img convert -f vmdk -O qcow2 -p <image_name>.vmdk <image_name>.qcow2
Upload snapshots to NGN Cloud Object Storage. Steps to take:
go to the Object storage section;
if you do not have a bucket, create it;
open the bucket and click Upload;
upload all necessary snapshots.
Select uploaded snapshots one by one.
Click Create snapshot.
Once all snapshots are created, go to the Images subsection and click Create.
In the dialog window, add volumes for the image.
Select snapshots created at step 6, one by one.
Order your volumes so that the root device is on the first list.
If the instance does not have Virtio drivers, set the Enable Legacy OS Support flag.
Click Create image.
Now you can create a VM instance from this image.
How to create and connect to a Linux instance#
Before you start using your Linux instance, make sure that your project has at least one subnet since if it is not specified, an instance cannot be created. If necessary, you can create a subnet on your own.
NGN Cloud supports SSH key authentication.
To add an SSH key, go to the SSH keys section and click Add key.
You can use cloud-generated or custom key. Enter its name and click Add.
Store the private key locally, since it will be used in the future to remotely access the Linux instance.
Creating an instance#
To create a new Linux instance, use instance wizard.
Provisioning a Linux instance#
Once the instance switches to the Running state, you can connect to it.
VMs created from NGN Cloud images are accessed under the ec2-user account, for which access by password is disabled. For this account, only access by SSH key is possible.
To connect via SSH, allow access from an external network to an appropriate port. Port 22 is used by default:
Open the instance page, go to the Network and Security tab, and click on the security group ID you plan to use to control outside access.
On the security group page, go to the Inbound rules tab.
Add an enabling rule for the tcp protocol and port
22.Associate Elastic IP with a network interface of this instance.
You can use any SSH client to access the instance.
Connecting to a Linux instance from Windows using Putty#
Here we consider connecting to an instance from a local Windows machine using Putty.
To use Putty with an SSH key that you saved earlier on a local computer in .pem format, it should be converted to .ppk format. For this purpose:
Run PuTTY Key Generator (PUTTYGEN.EXE).
Click Load to load the key in .pem format to it.
Once the key is loaded, click Save private key and save the key in .ppk format:
Now, you can connect using the SSH key:
Open Putty (PUTTY.EXE).
In the Session tab, enter Elastic IP of the instance network interface and port
22, then choose the SSH connection type.Then, go to the SSH section and choose the Auth category.
Click Browse to specify the path to the saved private part of the key (in the .ppk format)
Click Open.
In the command line, specify the ec2-user login
Connection is established.
Connecting to a Linux instance from MacOS#
Here we consider connecting to a Linux instance from a MacOS computer:
Open a terminal
Grant the necessary rights to the private key you downloaded at the VM creation step. Use the command:
chmod 0600 ~/Downloads/my_ssh_key.pem
Use the private key at (in our case) ~/Downloads/my_ssh_key.pem to connect to the server c2-217-73-60-2.elastic.cloud.ngn.com.tr as a ec2-user:
ssh ec2-user@c2-217-73-60-2.elastic.cloud.ngn.com.tr -i ~/Downloads/my_ssh_key.pem
Connection is established.
How to create and connect to a Windows instance#
Before you start using your Windows instance, make sure that your project has at least one subnet. If there is no subnet than an instance cannot be created. If necessary, you can create a subnet on your own.
Creating an instance#
To create a new Windows instance, use instance wizard.
Note
For Windows, we recommend choosing instance types with at least 4,096 MB RAM.
Provisioning a Windows instance#
Once the instance is in the Running state, connect to it via Remote console.
Go to the page of the running instance.
In the Information tab, click Open console.
Enter the required parameters and the administrator password to log on to the system.
To log into OS, press Ctrl+Alt+Delete. To transfer this key combination to the OS, you can click the rightmost button in the top right corner of the NGN Cloud remote console.
Enter the administrator password and press Enter.
Connecting to a Windows instance via RDP#
To connect to a Windows instance via RDP (Remote Desktop Protocol), you should enable access from an external network to an appropriate port:
Open the Network and Security tab on the instance page and click ID of the network interface that will be used for access.
On the network interface page, open the Security Groups tab and click ID of the security group where the instance is placed.
On the security group page, open the Inbound Rules tab and click Add.
Add a permitting rule for
TCP``protocol and ``3389port. To do so, selectTCPin the Protocol field, specifyto specificfor the Grant access to ports option and enter3389for Ports. If necessary, add a rule description.To prevent unauthorized users to access the console, we strongly recommend that you explicitly specify IP addresses from which access is permitted. For the Grant access option, select
from networkand in the Network field specify, in CIDR notation, the subnet or IP address from which access will be granted.Click Add. If necessary, add permitting rules for other addresses by repeating steps 3-5.
Associate Elastic IP with a network interface of this instance.
You can use any RDP client to connect to the instance from Windows. Specify Elastic IP of the Windows VM network interface as the connection address. Use the standard Administrator login and the password you specified when you first logged in the system via remote console.
How to install an OS from your template#
You can use your image for an operating system, for example, if the NGN Cloud does not have such an image. To do this, you should first install and configure the OS image locally on any virtualization platform: VMware, VirtualBox or Libvirt.
Important
Please install the virtio drivers to make your Windows templates work correctly in the cloud.
Once the OS template is set up, follow instructions on how to migrate virtual machines to the NGN Cloud.
How to restore a system using the Rescue CD#
Attention
Converting an ISO image to the required format will make it impossible to boot from it, since this image has no boot partition. We recommend using pre-built Rescue CD images in the following formats: VMDK, VHD, and Qcow2.
If you need to restore a system, you can use a Rescue CD in the following formats: VMDK, VHD, and Qcow2.
Download the image from the internet or use the images prepared by NGN Cloud snap-42BF33AD for Linux and snap-F9589992 for Windows.
Upload it into the object storage in the NGN Cloud.
Create a snapshot from the imported image.
Create a new volume from the snapshot.
Attach the volume as a second volume.
Restore the system in the menu mode. Steps to take:
stop the instance you need to restore;
set the parameter Root device name to menu on the instance page;
start the instance;
open a VNC console and wait for the boot device selection menu to appear;
Select the attached volume.
Start and stop an instance on schedule#
You can use this instruction to start and stop instances:
Install the c2-ec2 utility on a Windows or Linux machine that you plan to use for management tasks. This can be a cloud-based VM or any other computer with Internet access. Installation process is described in CROC Cloud API Client.
Use the following commands to enable/disable an instance on a machine with the c2-ec2 utility:
c2-ec2 StartInstances InstanceId.1 <instance_id> InstanceId.2 <instance_id>
c2-ec2 StopInstances InstanceId.1 <instance_id> InstanceId.2 <instance_id>
The schedule is set using a task scheduler (such as crond in Linux).
Here is an example of how to schedule a VM reboot every night at 2 A.M.:
crontab -e #command to access crond task scheduler (be sure to run it as a superuser)

0 2 * * * /usr/local/bin/restart
/usr/local/bin/restart in this example, this is the path to the script with the instance enabling/disabling commands
See more details of using c2-ec2 utility here: CROC Cloud API Client.
How to hibernate an instance#
To hibernate an instance, you should preconfigure the instance OS first.
Important
We do not guarantee that an instance without a proper preconfiguration will enter the hibernation mode after clicking the Hibernate button.
Attention
We do not recommend resizing the volume or changing the type of hibernated instance. Otherwise, the OS will boot normally, and the saved VM memory state will be ignored.
Configuring Windows to support hibernation#
To enable hibernation support for a recently launched Windows instance, follow these steps:
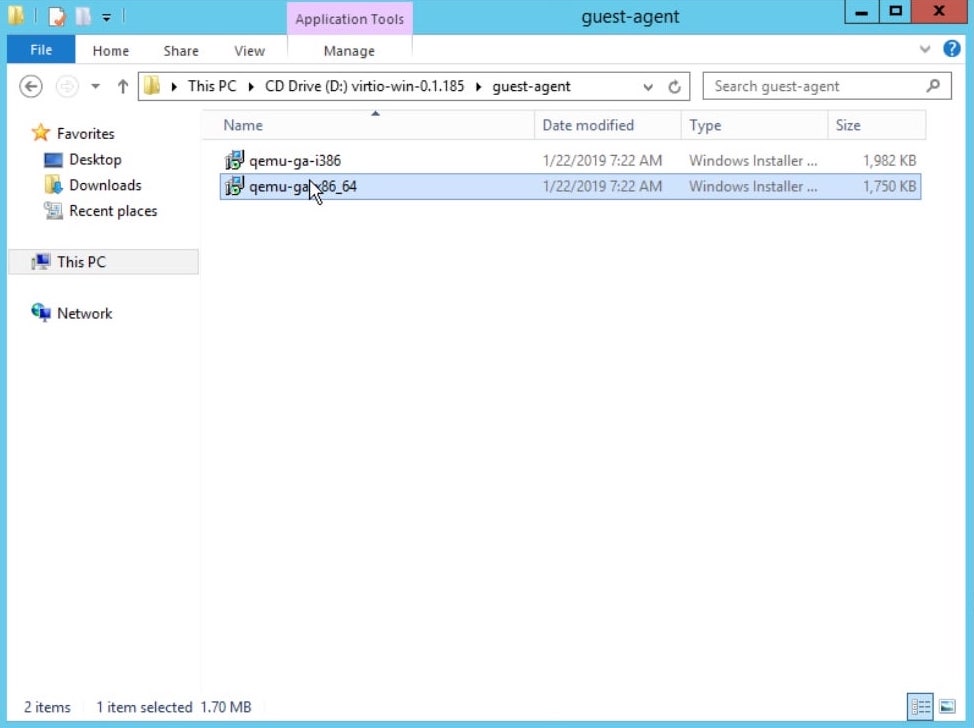
Download the image with qemu-guest-agent and drivers.
Mount the downloaded ISO image within a VM.
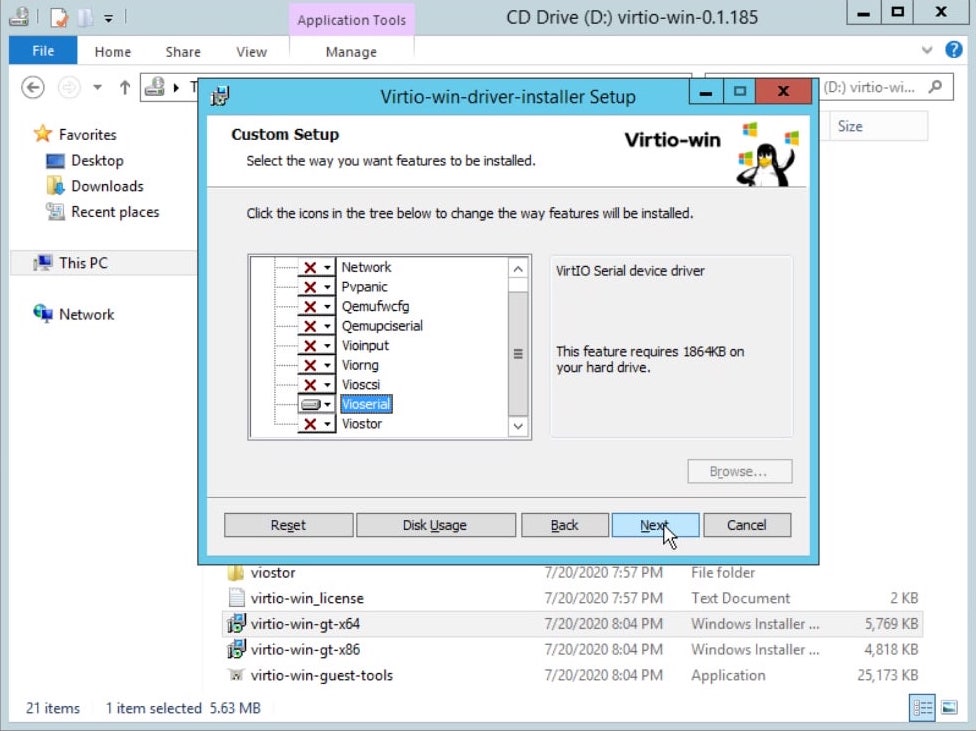
Install the Virtioserial driver.
Install qemu-guest-agent.
To enable hibernation on a running Windows instance, we recommend disabling the commands, which qemu-guest-agent does not use for hibernation:
Note
If you plan to back up this instance using NGN Cloud backup service, then do not disable guest-fsfreeze-* commands.
sc config QEMU-GA binPath= "C:\Program Files\Qemu-ga\qemu-ga.exe -d --retry-path --blacklist=guest-get-osinfo,guest-get-timezone,guest-get-users,guest-get-host-name,guest-exec,guest-exec-status,guest-get-memory-block-info,guest-set-memory-blocks,guest-get-memory-blocks,guest-set-user-password,guest-get-fsinfo,guest-set-vcpus,guest-get-vcpus,guest-network-get-interfaces,guest-suspend-hybrid,guest-suspend-ram,guest-fstrim,guest-fsfreeze-thaw,guest-fsfreeze-freeze-list,guest-fsfreeze-freeze,guest-fsfreeze-status,guest-file-flush,guest-file-seek,guest-file-write,guest-file-read,guest-file-close,guest-file-open,guest-shutdown,guest-info,guest-set-time,guest-get-time,guest-sync,guest-sync-delimited"
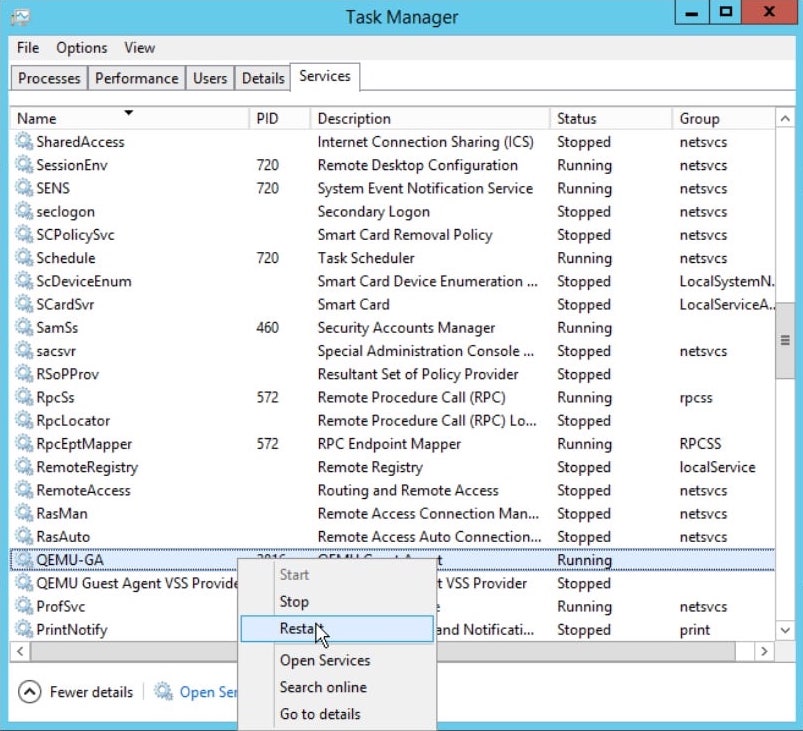
Restart the qemu-guest-agent service.
Reboot the operating system.
To enable hibernation support, use the command:
powercfg /h on
powercfg /h size 100
Configuring Linux to support hibernation#
Linux requires a swap to be able to enter the hibernation mode.
As a swap, you can use:
a separate volume,
a partition on an existing volume,
a file in the file system.
Important
Regardless of the swap type (file or volume), it must be larger than the RAM size of the instance.
Configuring a partition/volume as swap to support hibernation#
Create an additional partition (for example, /dev/vda3) on an existing volume or attach a new volume. This partition/volume will be used to move/store data from the memory dump. How fast the instance enters/exits the hibernation mode depends on the performance of a volume used as swap.
Format the created partition or attached volume as swap and activate it with the command:
mkswap /dev/vda3
swapon /dev/vda3
Add the following record about the swap partition to /etc/fstab:
/dev/vda3 swap swap defaults 0 0
Instead of /dev/vda3, you may specify the partition ID
UUID=b05509b2-82f1-4edb-a80e-ef8d0c100ac0from the blkid output:blkid … /dev/vda3: UUID="2c031b77-92bd-45b4-876e-18f1de7d4674" TYPE="swap" …
Set kernel parameters. In /etc/default/grub, add the
resume=/dev/vda3parameter to theGRUB_CMDLINE_LINUXvariable (you can also use UUID):GRUB_CMDLINE_LINUX="console=tty0 crashkernel=auto console=ttyS0,115200 resume=/dev/vda3"
Generate a new configuration file for
grubloader:grub2-mkconfig --output=/boot/grub2/grub.cfg
Set the following value for the
resumeparameter:lsblk /dev/vda3 NAME MAJ:MIN RM SIZE RO TYPE MOUNTPOINT vdb 253:16 0 32G 0 disk [SWAP]
Use major:minor numbers of the swap partition:
echo "253:16" > /sys/power/resume
Configure a swap file to support hibernation#
Important
To setup a swap file for hibernation, OS reboot is required.
Create a file (for example, of 10 GiB):
dd if=/dev/zero of=/swapfile count=10 bs=1GiB
Format the resultant file as swap and activate it using the commands:
mkswap /swapfile
chmod 600 /swapfile
swapon /swapfile
Add the following record about the swap file to /etc/fstab:
/swapfile swap swap defaults 0 0
Find out the swap file offset on the volume. For the ext3/ext4 and xfs file systems, use the following command:
filefrag -v /swapfile | awk '{ if($1=="0:"){print substr($4, 1, length($4)-2)} }'
Set kernel parameters. In /etc/default/grub, add the
resume=<partition name> resume_offset=<value>parameter to theGRUB_CMDLINE_LINUXvariable:GRUB_CMDLINE_LINUX="console=tty0 crashkernel=auto console=ttyS0,115200 resume=/dev/vda1 resume_offset=181367"
You can find out the
<partition name>where the swapfile is located, as follows:findmnt -no SOURCE -T /swapfile /dev/vda1
Generate a new configuration file for
grubloader:grub2-mkconfig --output=/boot/grub2/grub.cfg
Reboot the operating system.
Configuring qemu-guest-agent to hibernate a CentOS instance#
Make sure that qemu-guest-agent is installed or install it using the command:
yum install qemu-guest-agent
To enable hibernation on a recently started CentOS instance, we recommend disabling the commands, which qemu-guest-agent does not use for hibernation. To do this, change the
BLACKLIST_RPCparameter in the /etc/sysconfig/qemu-ga configuration file:BLACKLIST_RPC=blacklist=guest-get-osinfo,guest-get-timezone,guest-get-users,guest-get-host-name,guest-exec,guest-exec-status,guest-get-memory-block-info,guest-set-memory-blocks,guest-get-memory-blocks,guest-set-user-password,guest-get-fsinfo,guest-set-vcpus,guest-get-vcpus,guest-network-get-interfaces,guest-suspend-hybrid,guest-suspend-ram,guest-fstrim,guest-fsfreeze-thaw,guest-fsfreeze-freeze-list,guest-fsfreeze-freeze,guest-fsfreeze-status,guest-file-flush,guest-file-seek,guest-file-write,guest-file-read,guest-file-close,guest-file-open,guest-shutdown,guest-info,guest-set-time,guest-get-time,guest-sync,guest-sync-delimited
Restart the qemu-guest-agent service:
systemctl restart qemu-guest-agent
Configure qemu-guest-agent to hibernate an Ubuntu instance#
Install qemu-guest-agent, using the following commands:
sudo apt update
sudo apt install qemu-guest-agent
To enable hibernation on a recently started Ubuntu instance, we recommend disabling the commands, which qemu-guest-agent does not use for hibernation:
cat <<EOT > /etc/qemu/qemu-ga.conf
[general]
blacklist=blacklist=guest-get-osinfo,guest-get-timezone,guest-get-users,guest-get-host-name,guest-exec,guest-exec-status,guest-get-memory-block-info,guest-set-memory-blocks,guest-get-memory-blocks,guest-set-user-password,guest-get-fsinfo,guest-set-vcpus,guest-get-vcpus,guest-network-get-interfaces,guest-suspend-hybrid,guest-suspend-ram,guest-fstrim,guest-fsfreeze-thaw,guest-fsfreeze-freeze-list,guest-fsfreeze-freeze,guest-fsfreeze-status,guest-file-flush,guest-file-seek,guest-file-write,guest-file-read,guest-file-close,guest-file-open,guest-shutdown,guest-info,guest-set-time,guest-get-time,guest-sync,guest-sync-delimited
EOT
Restart the qemu-guest-agent service:
systemctl restart qemu-guest-agent
How to correct the resetting time error in Windows#
To resolve the time problem, you have to edit Windows registry so that it accepts the BIOS time as UTC:
Open Windows registry (Win+R regedit Enter)
Open
HKEY_LOCAL_MACHINE\SYSTEM\CurrentControlSet\Control\TimeZoneInformation.Create new
DWORD, name itRealTimeIsUniversal, and set value to1.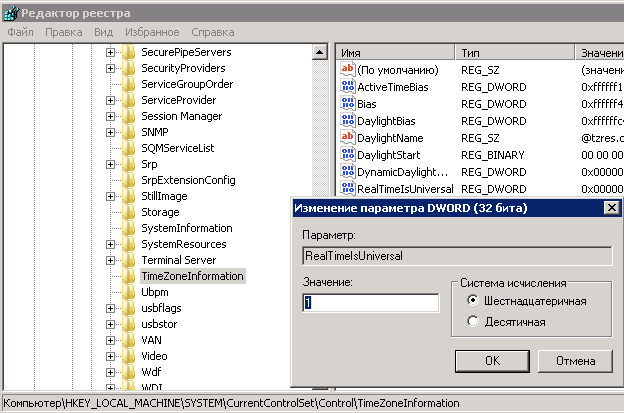
Reboot your instance