Identity providers
In this article:
Identity providers#
Attention
Access to the Identity providers section in the NGN Cloud web interface is granted at request. To get it, submit a request via our support portal or email us at support@ngn.com.tr.
The Identity providers service supports external Identity Provider (IdP) for users to log in to NGN Cloud. The identity provider connects to the cloud using OpenID Connect (OIDC), an OAuth 2.0 protocol implementation. The identity provider can be any OIDC compliant provider, such as AD FS, Azure, and Keycloak.
Integration of the identity provider with the IAM cloud service enables centralized user management in the cloud. If the provider is properly configured, groups are synchronized between the provider and NGN Cloud using the token mechanism. Adding/removing user to/from a group automatically grants/revokes the rights granted to the respective group in the cloud. Thus, cloud access is controlled without need to set privileges for each user individually.
Note
Users who use IdP to log in to NGN Cloud, are treated as temporary users. Therefore, we recommend these users to work via web interface only and avoid using their local accounts in automation tools. For these purposes, creating standard cloud users would be still a better option.
Note
Integration with IdP allows you to control access to all cloud resources, except for object storage. In one of the upcoming releases, we are going to enable logging in to the object storage using IdP.
For Active Directory, Azure or Keycloak users to access NGN Cloud, preconfigure the identity provider, configure NGN Cloud integration point, and create groups with the required privileges.
Attention
When a user connects to the cloud, the identity provider must pass the following claims:
upn or preferred_username with a unique user ID (login, email address, etc.);
group or groups with a list of groups (in the cloud, you must specify the group names exactly as they are passed in id_token).
Note
To log in to the cloud, users should use a link in the following format: https://<name>.idp.cloud.ngn.com.tr, where <name> is the provider name in NGN Cloud.
IdP and cloud synchronization#
Access right are synchronized using tokens. The cloud regularly polls IdP server and makes necessary changes to the user’s privileges. For example, if a user is removed from a group, he/she is automatically deprived of project and administrative privileges assigned to the group of the same name in the cloud.
Upon the first logging in, OpenId Connect sends three keys, or tokens, such as id_token, access_token and optionally refresh_token. The first token contains information required for logging in (user login and group name), the second one provides the key to access resources, while the third token refreshes keys. The access_token and refresh_token have their own predetermined lifetimes.
For synchronization, the cloud requests tokens every 15 minutes using refresh_token. If IdP is not configured for sending refresh_token, synchronization does not function and the account will be locked after access_token lifetime expires.
If refresh_token is sent, then tokens, including id_token, are requested every 15 minutes. If authorization-related (i.e. group membership) information in the token is changed, user rights in the cloud will be updated.
The user access is locked after refresh_token lifetime expires. To regain access to cloud resources, the user should log into the cloud again.
Cloud integration point setup#
To set up the integration point in the cloud, create a provider. If your company uses several Active Directory or Azure Active Directory services or Realms in Keycloak, then you can create a separate provider for each of them.
Create a provider#
To set up the provider:
Go to IAM Identity providers Providers section in NGN Cloud web interface.
Click Create.
Specify the provider name.
Note
Its name should be unique within NGN Cloud. It may contain low-case Latin letters, digits, and hyphens and should have 4-10 characters in total.
When your enter the name, a generated link to the cloud console entry point is displayed in the lower part of the dialog window. This link should be specified as Redirect URI when configuring OpenID Connect in IdP.
In the Client ID field, paste the Client Identifier that you specified when configuring IdP.
In the Client secret field, paste the client secret that was generated when configuring IdP.
Specify URLs of endpoints for authentication, tokens, and session termination. Below are the examples of URLs for AD FS, Azure, and Keycloak (specific URL format may vary).
By default, the full address to the OAuth endpoint is https://<server_address>/adfs/oauth2/, where server_address is the AD FS server address. Accordingly, you need to specify the following addresses:
https://<server_address>/adfs/oauth2/authorize in the Auth URL field;
https://<server_address>/adfs/oauth2/token in the Token URL field;
https://<server_address>/adfs/oauth2/logout in the Logout URL field.
How to obtain endpoint URLs in case of Azure is described in in the instruction. You need to copy URLs for authorization_endpoint, token_endpoint and end_session_endpoint. Below are examples of possible URLs that you should entere in the appropriate fields:
https://login.microsoftonline.com/<directory_id>/oath2/v2.0/authorize in the Auth URL field;
https://login.microsoftonline.com/<directory_id>/oath2/v2.0/token in the Token URL field;
https://login.microsoftonline.com/<directory_id>/oath2/v2.0/logout in the Logout URL field.
Endpoints for Keycloak can be found in the configuration file for OpenID Connect endpoints (for details, see the instruction for connecting Keycloack). You need to copy URLs for authorization_endpoint, token_endpoint and end_session_endpoint. Below are examples of possible URLs that you should enter in the appropriate fields:
https://<server_address>/realms/<realm_name>/protocol/openid-connect/auth in the Auth URL field;
https://<server_address>/realms/<realm_name>/protocol/openid-connect/token in the Token URL field;
https://<server_address>/realms/<realm_name>/protocol/openid-connect/logout in the Logout URL field.
Click Create.
Change provider parameters#
You can view the current settings of the integration point (provider) in the Information tab on the provider page:
provider name;
client ID used by IdP to recognize the client application;
client secret;
addresses of endpoints for authentication, tokens, and session termination;
address of the entry point to the cloud console for users.
To change their values, do the following:
Go to IAM Identity providers Providers section.
Click the provider name in the resource table to go to its page.
To edit a certain parameter, open Information tab and click the symbol next to it.
Note
The entry point address changes automatically if the name of the provider changes.
Delete a provider#
Attention
When the provider is deleted, its users will lose access to NGN Cloud.
You can delete a provider using one of the following methods.
To delete several providers at a time,
Go to IAM Identity providers Providers section.
choose one or more providers to be deleted in the resource table.
Click Delete.
In the dialog window, confirm the action.
Using this method, you can delete only the selected provider:
Go to IAM Identity providers Providers section.
Click the provider name in the resource table to go to its page.
Click :Delete in the Information tab.
In the dialog window, confirm the action.
Group management#
Groups help you manage user access to NGN Cloud resources. When logging into the cloud, users gain the rights automatically depending on the group they belong to. If a user does not belong to a group or no cloud privileges are assigned to his/her group, the user can only view his/her profile.
The same user can be a member of more than one group at a time. He/she gets a set of privileges granted to these groups in the cloud. Groups can have overlapping privileges.
Create a group#
To create a group in the cloud:
Go to IAM Identity providers Groups section.
Click Create.
Choose a provider from the drop-down list in the dialog window.
Specify the group name.
Note
The group name must be exactly the same as the group name passed in the Claim named group.
Click Create.
If you need to create more than one group, repeat the above steps.
Add a group to the project#
To allow group members to use cloud services, add the group to the project and set project privileges. The project privileges can be set either when adding the project or later.
Go to IAM Identity providers Groups section.
Choose the necessary provider in the drop-down list.
Go to the page of the group that you want to add to the project.
Open the Projects tab and click Add.
To make the project resources accessible by group members, choose the respective project in the dialog window.
Choose project roles. They determine what resources will be accessible by the group members. You can choose several roles at a time. For details, read IAM documentation.
Click Add.
If you have to provide a group with access to several projects, repeat the above steps.
Exclude a group from the project#
When a group is removed from a project, users who are members of the corresponding IdP group may lose access to some of the project resources. Which resources will remain available to a particular user depends on what other groups he/she belongs to are still associated with the project and what privileges they give.
To remove a group from the project:
Go to IAM Identity providers Groups section.
Choose the necessary provider in the drop-down list.
Go to the group page and open the Projects tab.
Choose the project from the resource table and click Remove. Note, that the project itself will not be deleted.
In the dialog window, confirm the action.
Attention
Deleting a project on the project page deletes the project with all the resources.
Delete a group#
When a group is removed, users from the respective IdP group may lose access to projects to which the group was previously added. Which projects will remain available to a particular user depends on what other groups he/she belongs to and what projects these groups are added to.
To delete a group:
Go to IAM Identity providers Groups section.
Choose the necessary provider in the drop-down list.
In the resource table, choose a group to be deleted. You can delete several groups at the same time.
Click Delete.
In the dialog window, confirm the action.
A group can also be deleted in the Information tab on the group page.
Group privilege setup#
You can provide a group with access to resources (i.e. services, as per the cloud terminology) of any project and set administrative privileges. These privileges are provided to all users that are members of the corresponding group in the identity provider. Project and administrative privileges for the group are set up in a similar way as those for cloud users.
Add project privileges#
To provide a group with access to project resources, do the following:
Go to IAM Identity providers Groups section.
Choose the necessary provider in the drop-down list.
Go to the page of the group whose project privileges you want to change and open the Projects tab.
Click Set up near the desired project.
In order to add project privileges, click Add on the project page that opens.
From drop-down lists, choose the service for which the group needs to be granted a permission and actions that can be performed with this service.
Confirm the action by clicking Add.
Add administrative privileges#
You can provide the group with administrative privileges for user and billing services. These privileges will be granted to all users that are members of the corresponding group in the identity provider. Therefore, be cautious when providing them. For details about administrative privileges see IAM documentation.
Go to IAM Identity providers Groups section.
Choose the necessary provider in the drop-down list.
Go to the page of the group whose administrative privileges you want to change.
Open the Admin grants tab and click Add.
In the dialog window, choose the privileges you want to grant from the drop-down list.
Confirm your choice by clicking Add.
If you need to provide a group with additional administrative privileges, repeat the above steps.
Limit project privileges#
To limit group members’ access to project resources, do the following:
Go to IAM Identity providers Groups section.
Choose the necessary provider in the drop-down list.
Go to the page of the group for whose members you want to change project privileges and open the Projects tab.
On the page that opens, select the services which you do not want to be used.
Click Delete.
Confirm the action.
Note
Users can still have access to project resources if similar privileges are granted to them in other groups.
Limit administrative privileges#
To limit group’s administrative privileges, do the following:
Go to IAM Identity providers Groups section.
Choose the necessary provider in the drop-down list.
Go to the page of the group for whose members you want to change project privileges and open the Admin grants tab.
Select the services which you do not want to be used.
Click Delete.
Confirm the action in the dialog window.
Configuring an integration point for IdP#
Configure integration point in AD FS#
To be able to use Active Directory Federation Service (AD FS) as an identity provider for NGN Cloud, you should set up an AD FS integration point.
With proper settings, users can use their local accounts to log in to the cloud. If a user has already logged in to his/her local account, the Single Sign-On (SSO) feature enables automatic logging in to the cloud.
Note
You should have an AD FS server farm installed and set up.. The step-by-step instruction describes how to set up AD FS for Windows Server 2016.
Configure OpenID Connect in AD FS#
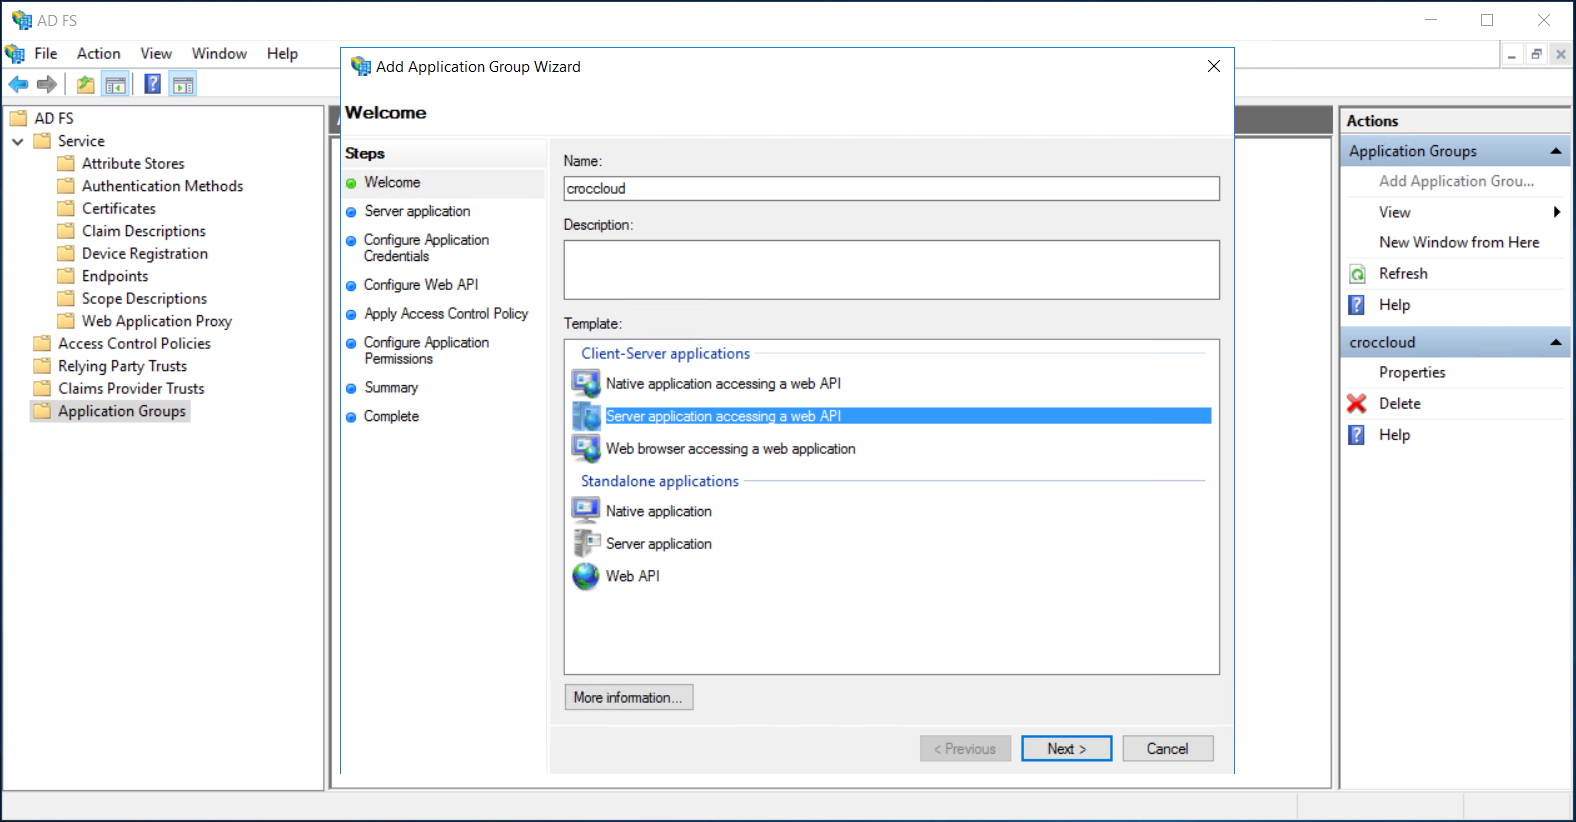
To connect to NGN Cloud via OpenID Connect protocol, you need to configure Application Groups.
Open AD FS Management control panel in Tools menu in the right upper corner of Server Manager of AD FS server.
Select Application Groups in the left menu.
Click Add Application Group… in the right menu or right-click Application Groups and select Add Application Group….
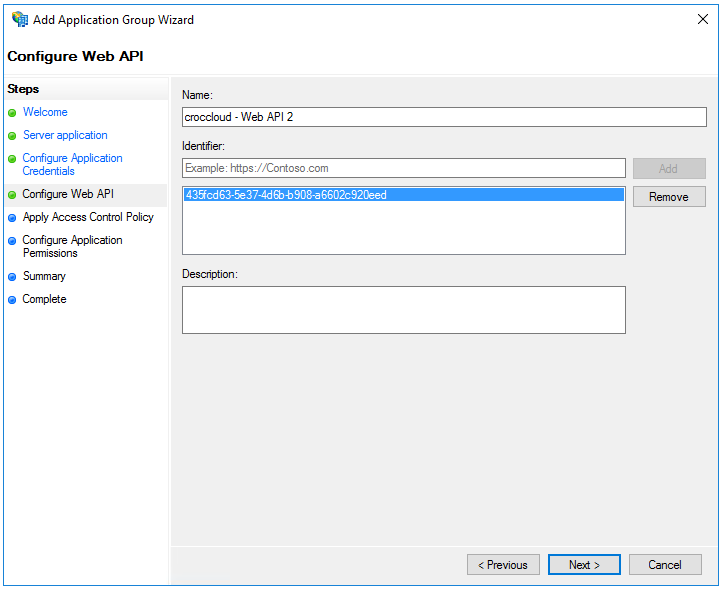
Specify an arbitrary name for Application Group, select Server application accessing a web API in Client-Server Applications box, and click Next.
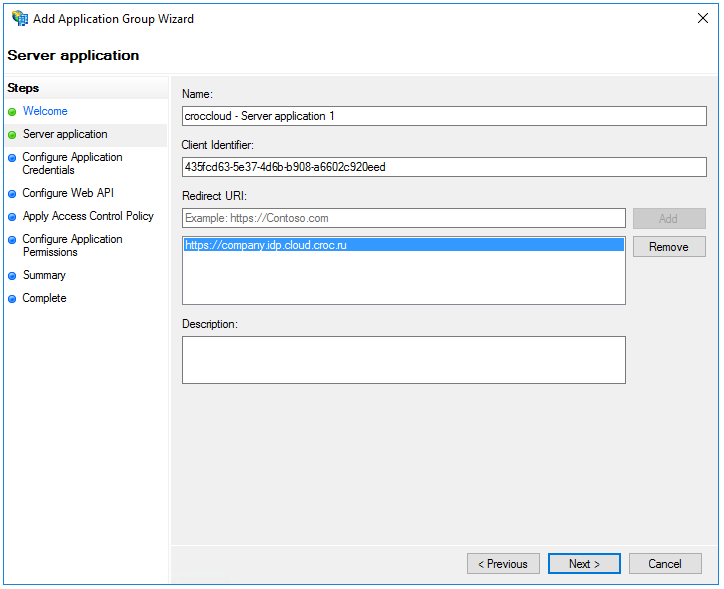
Copy and save Client Identifier; you will use it in the next steps and when setting up an integration point in NGN Cloud. AD FS employs client identifier to detect a client application.
Insert https://<name>.idp.cloud.ngn.com.tr in the Redirect URI field. Here <name> is the name of the provider in NGN Cloud. Click Add and then click Next to advance to the next step.
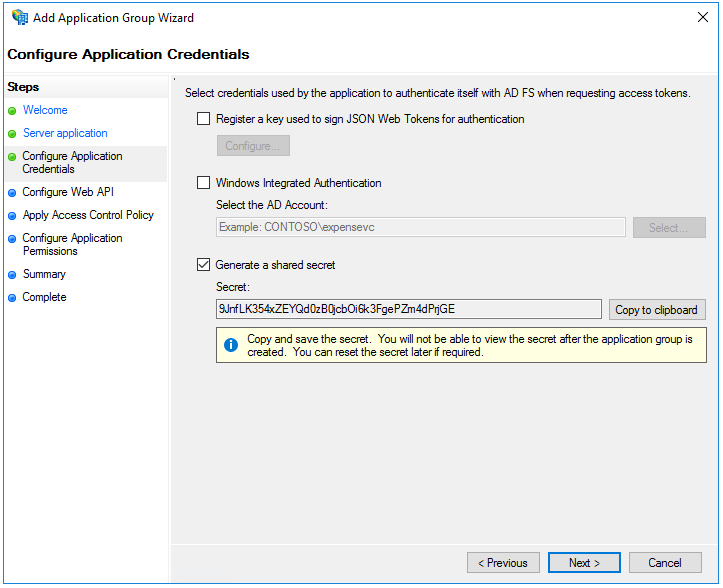
Generate a client secret by selecting Generate a shared secret. Save the secret — it is required to configure the integration point in the cloud. If you lose the secret, you will have to generate it again. Click Next to advance to the next step.
In the Identifier field, specify the saved Client Identifier and click Add. Click Next to advance to the next step.
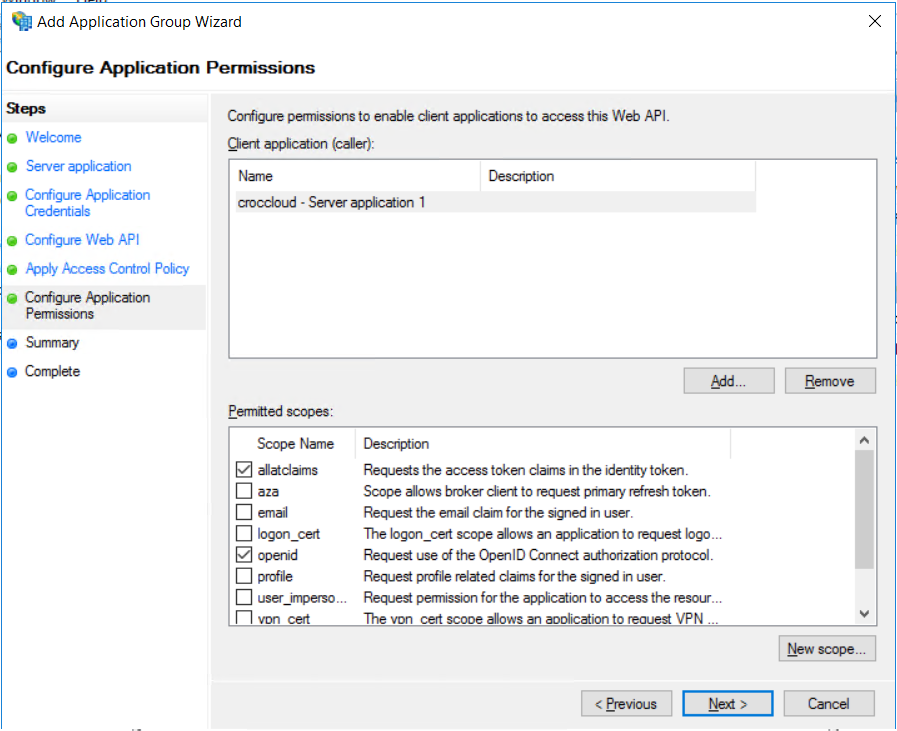
Select the access control policy in compliance with the accepted company rules.
Set access permissions for client applications. Enable allatclaims and openid options.
Check the specified parameters and complete the creation of the Application Group.
Configure Claims for Active Directory#
Note
In case of AD FS, you do not need to manually set the upn claim because it is generated automatically.
You should set up a claim for user groups so that information about user membership in groups could be transferred to the cloud.
Open AD FS Management control panel in Tools menu in the right upper corner of Server Manager of AD FS server.
Select Application Groups in the left menu.
Double-click the name of the Application Group created earlier, select Web API, and click Edit.
Open the Issuance transform rule tab and click Add rule….
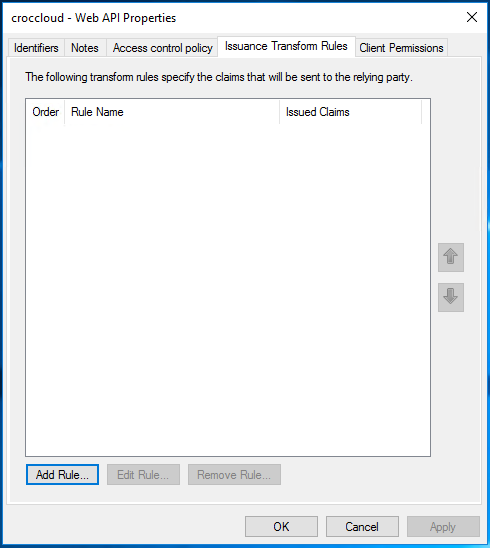
Select
Send LDAP Attributes as Claimsas Claim rule template and click Next.
Specify the rule name and choose
Active Directoryas Attribute Store.In the table below, select
Token-Groups Unqualified Namesas LDAP Attribute and selectGroupas Outgoing Claim Type.Note
Using Unqualified Name is not mandatory and is provided just as an example.
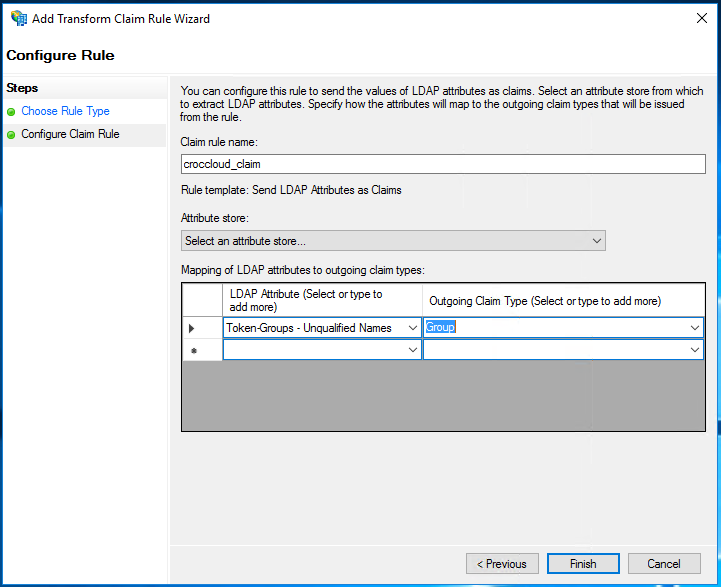
Click Finish to create the rule and close the property editing windows.
Configure integration point in Azure#
To use Azure as an IdP for NGN Cloud, first register and configure an application in Azure Active Directory.
Application registration in Azure Active Directory#
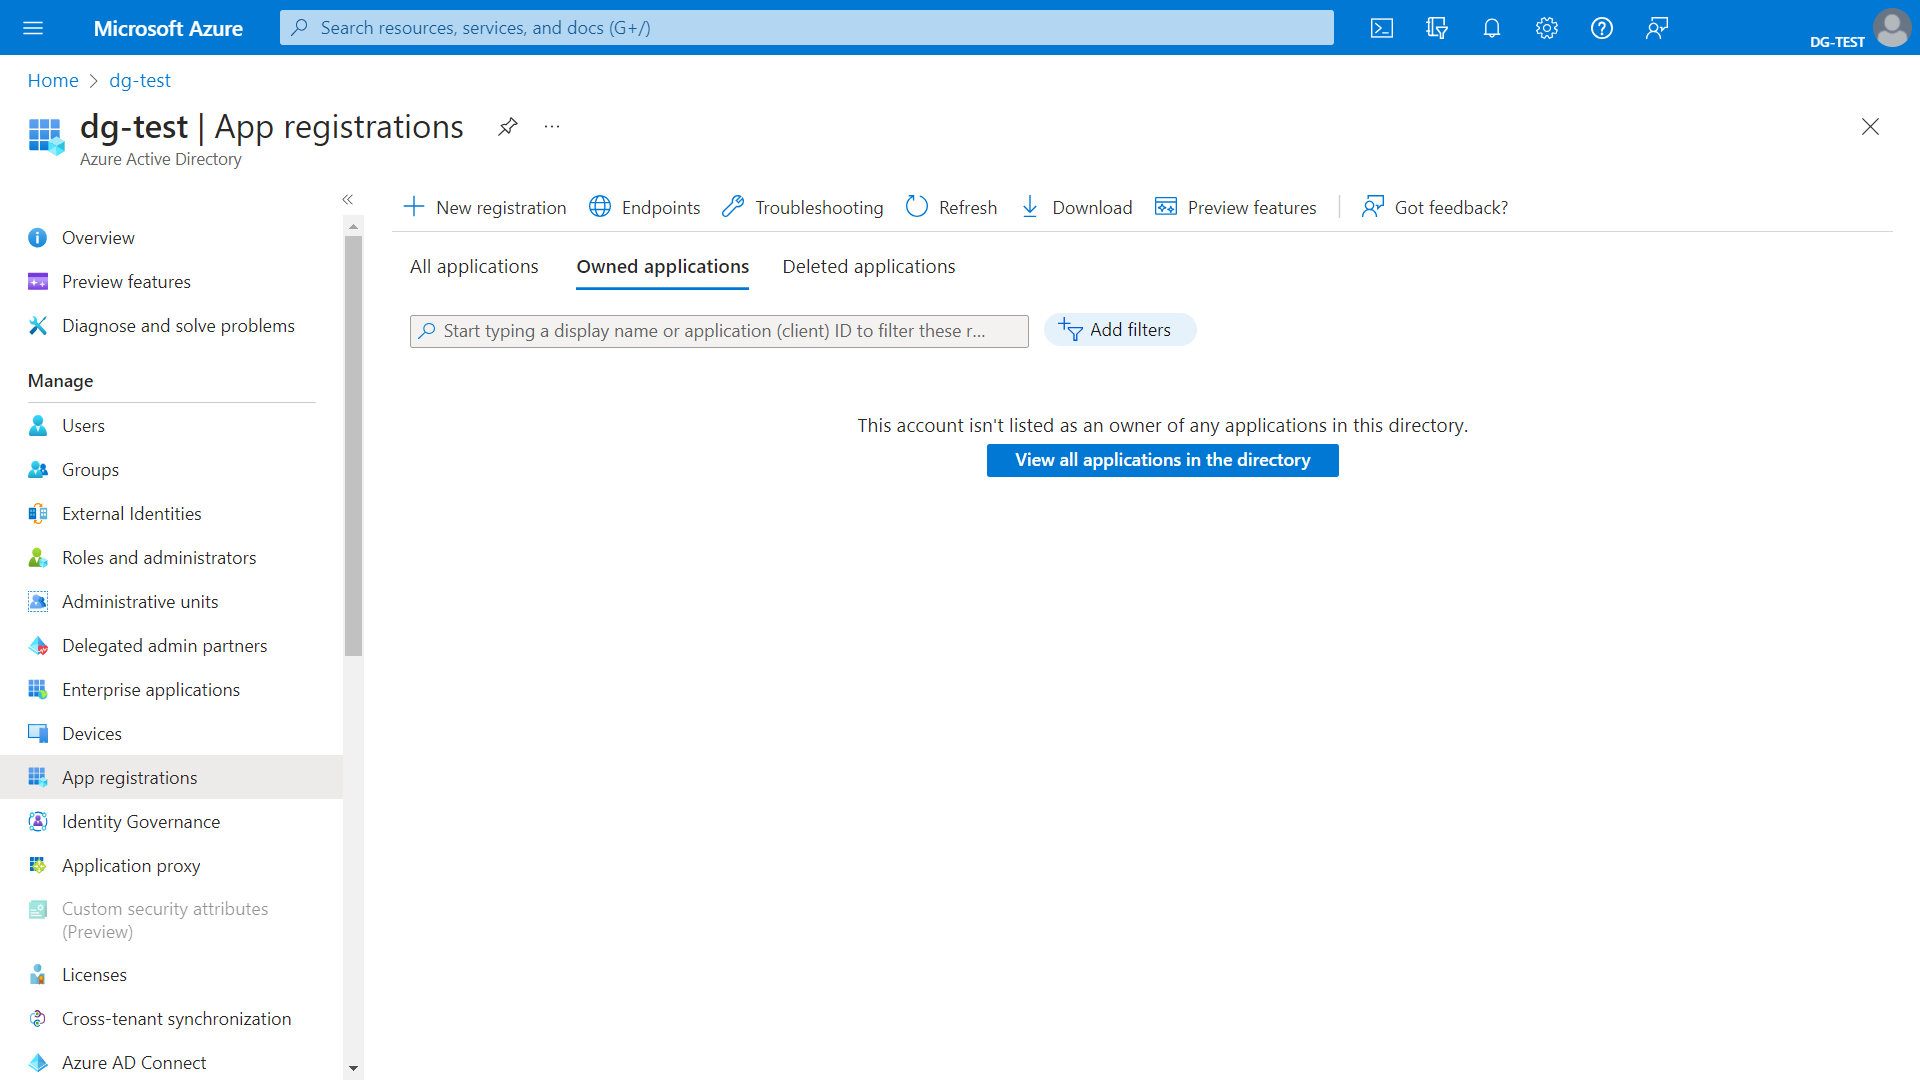
In Azure cloud management console, go to Azure Directory Services and, in Manage menu, select App registrations.
Click New registration and on the page that opens, specify the application name and select the required account type. You may skip Redirect URI for now.
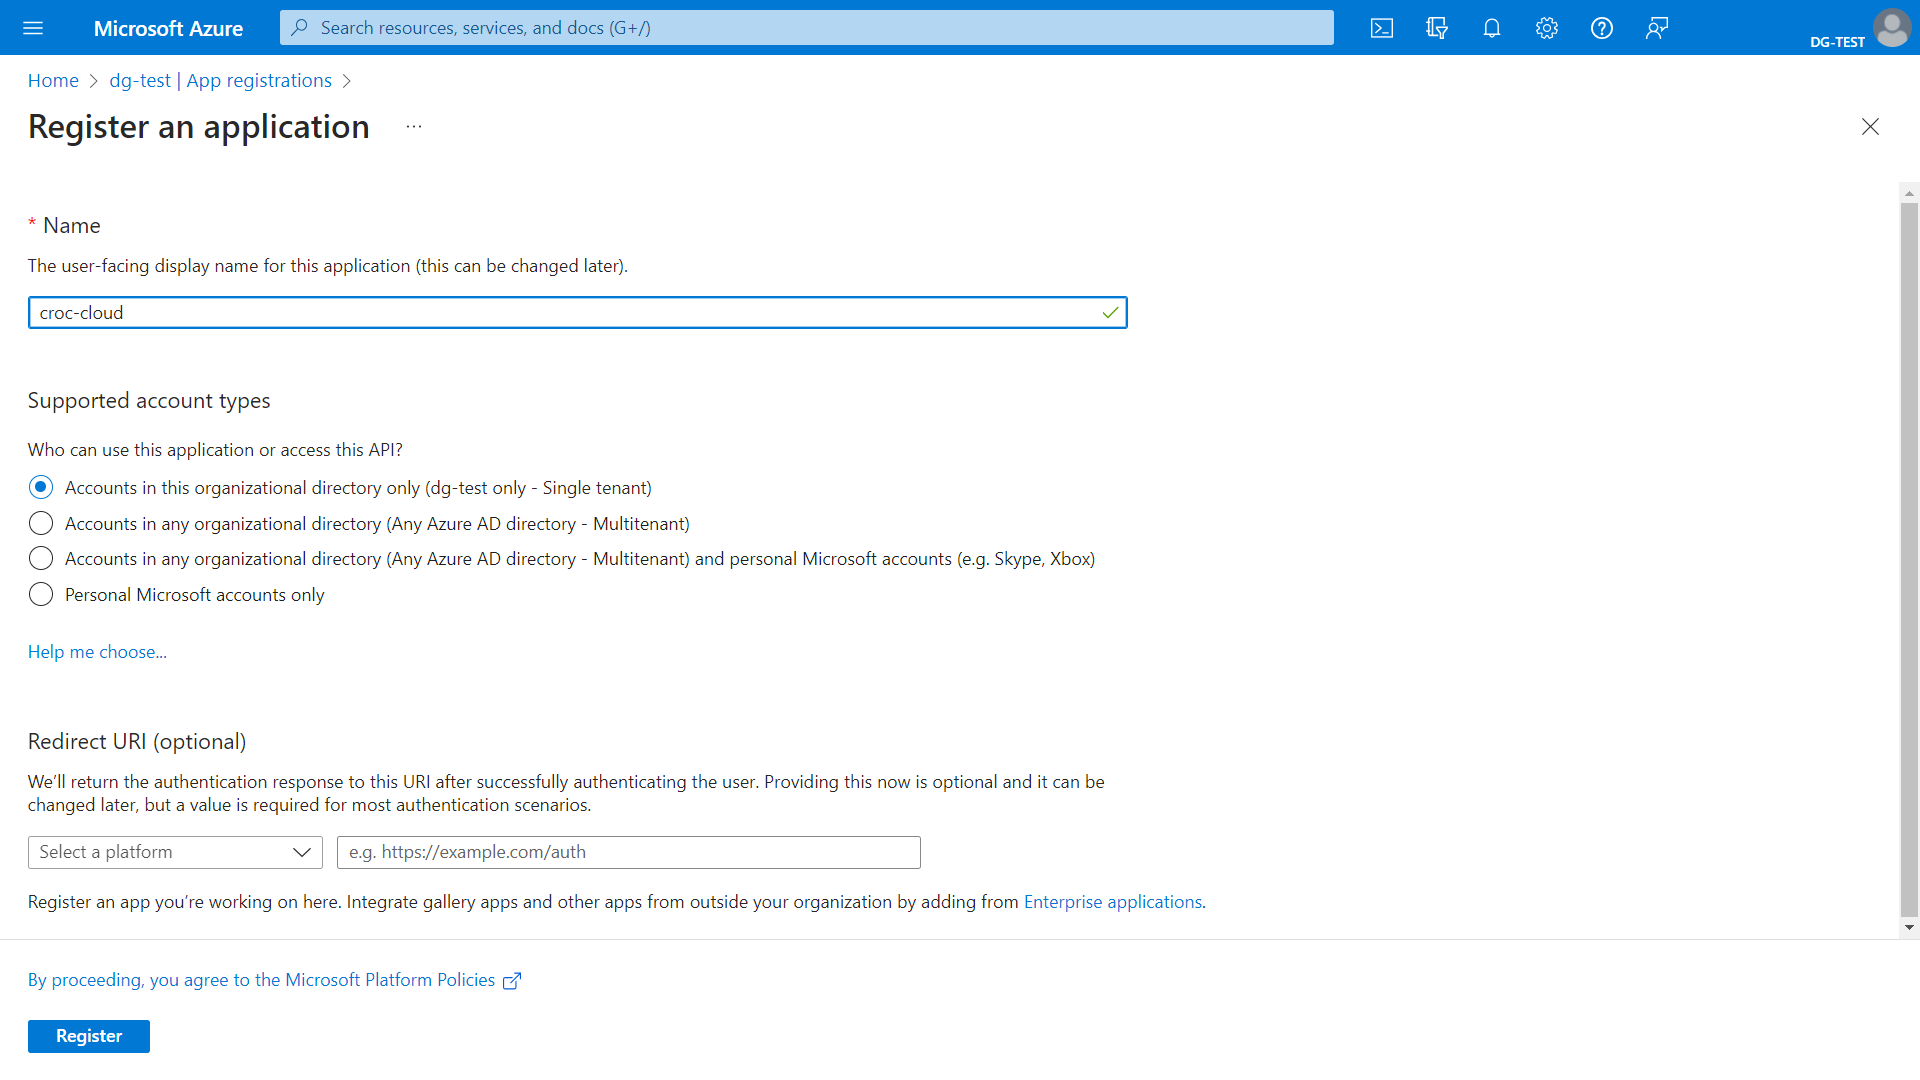
Click Register.
Obtain settings for an integration point in NGN Cloud#
After registering the application, save the necessary parameters for configuring the integration point in NGN Cloud.
Open the page of the created application (it opens automatically after registration) and, in the Overview section, copy and save Application (client) ID. It must be entered as Client ID when configuring a provider in NGN Cloud.
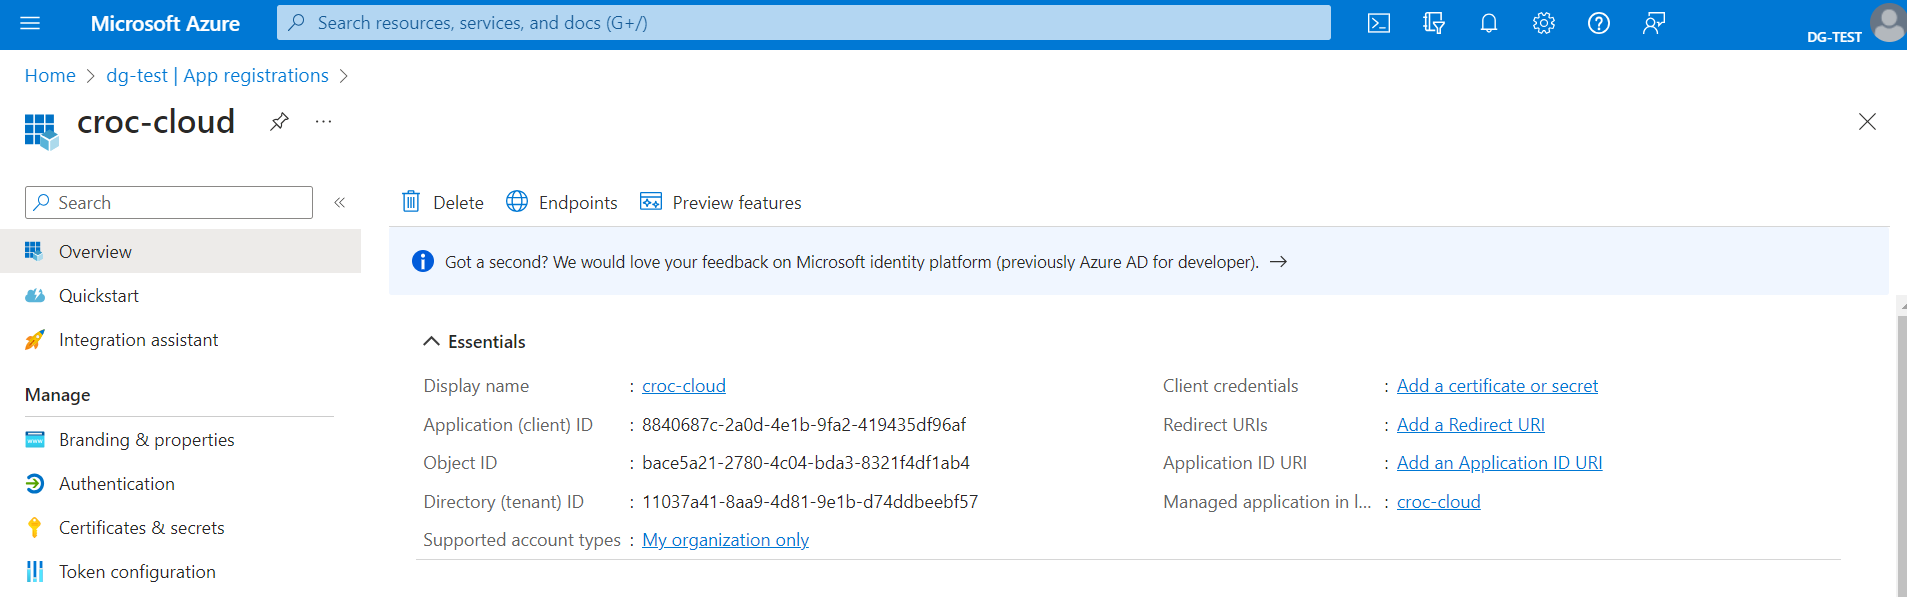
In addition, you will need URLs for authentication, tokens, and end-of-session endpoints. To find them, in the Overview section, click Endpoints and copy the link to OpenID Connect metadata document.
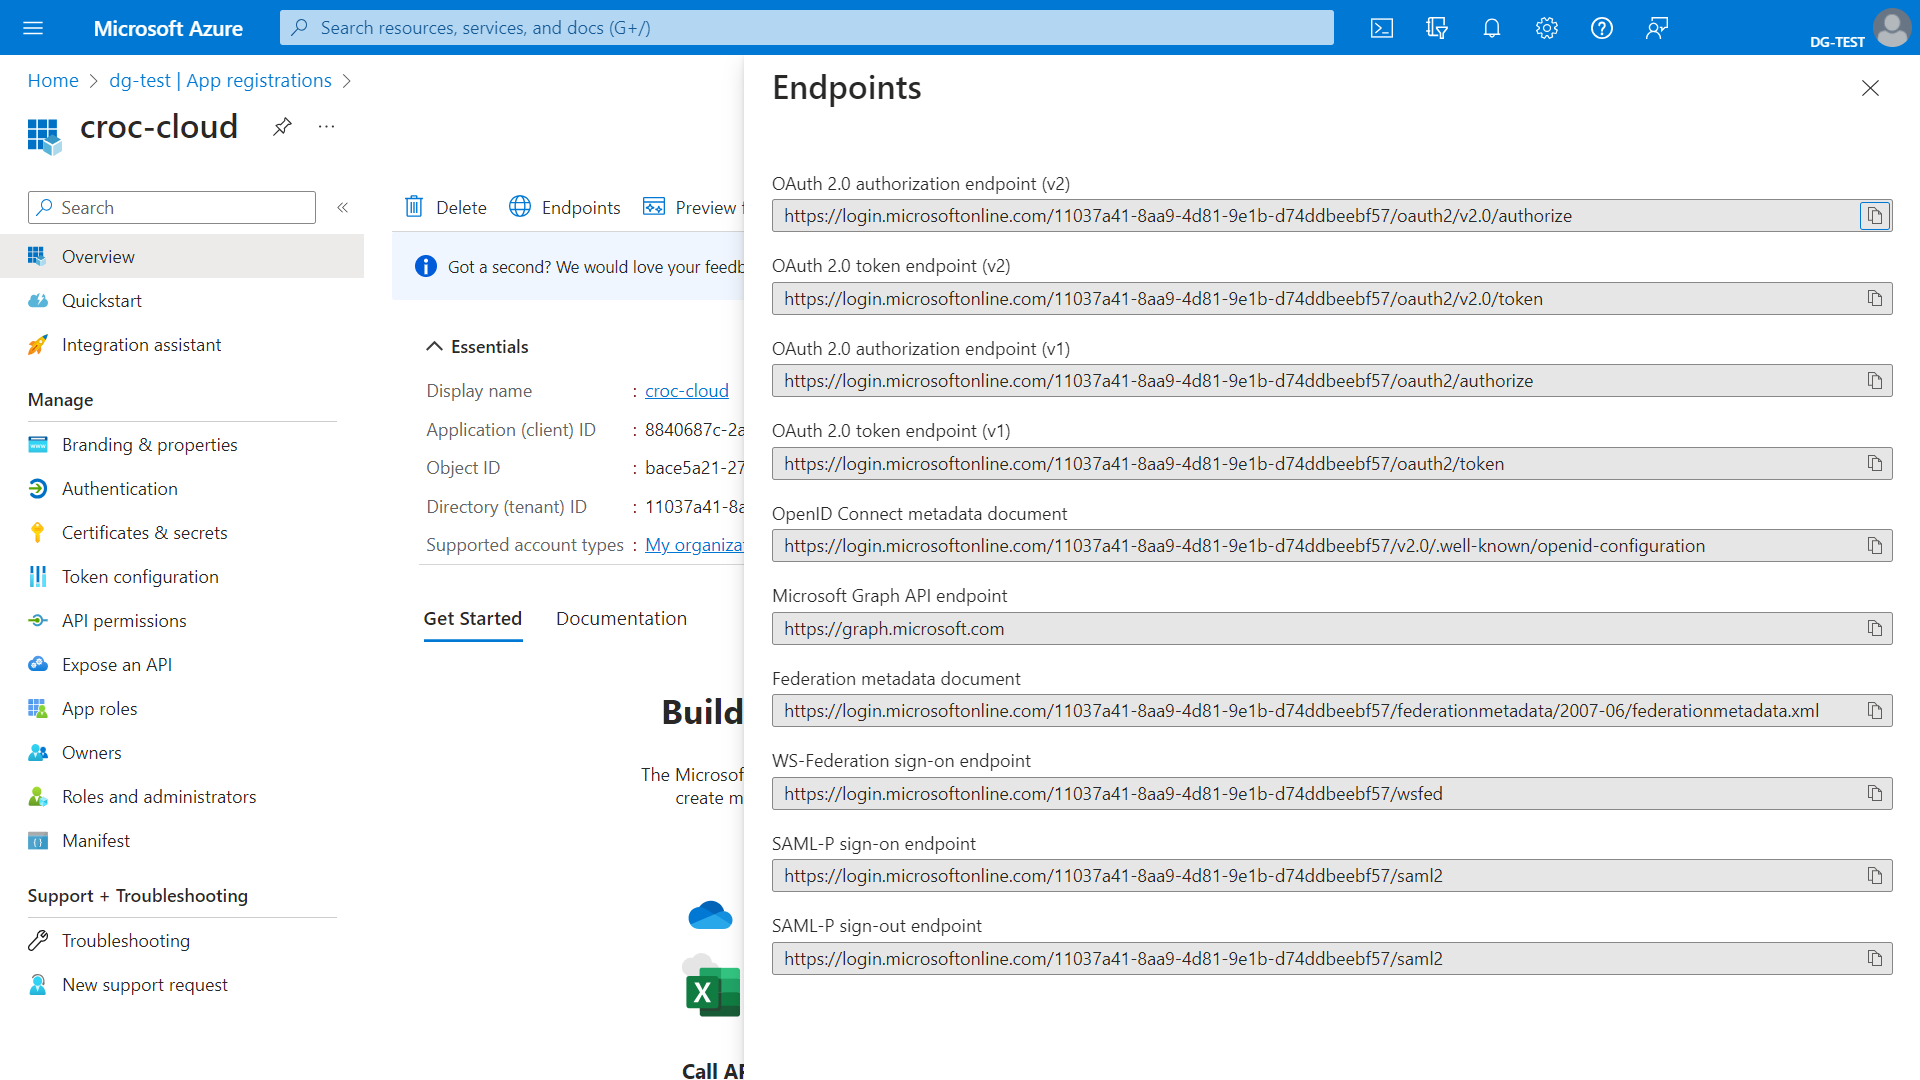
Follow this link and in the document that opens, find and save links to authorization_endpoint, token_endpoint and end_session_endpoint.

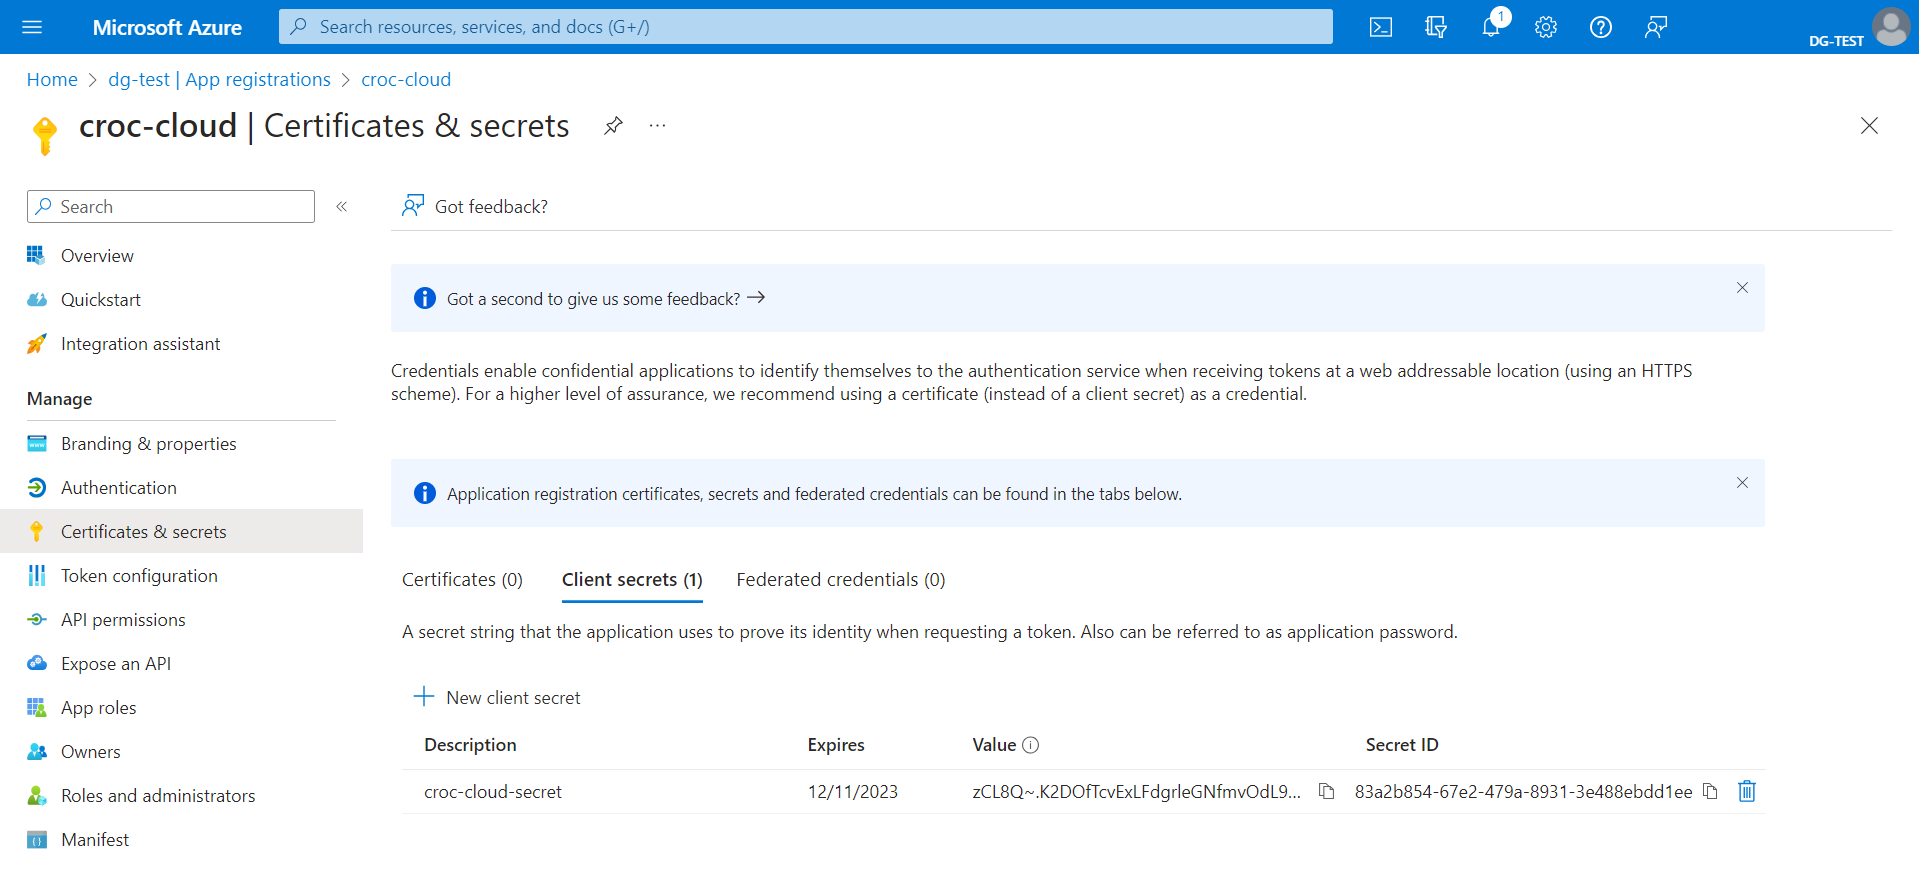
To generate a client secret, in the Manage menu, go to the Certificates & secrets section and, in the Client secrets tab, click New client secret. On the page that opens, enter the secret description and its expiry date and click Add. Copy and save the secret value.
Attention
Save the secret right away. When you re-open the Client secrets tab, the secret will be hidden and you will have to generate it again.
Now, you have everything you need to configure an integration point in NGN Cloud. Upon configuring this point, you can complete the application configuration in Azure Active Directory.
Configure the application in Azure Active Directory#
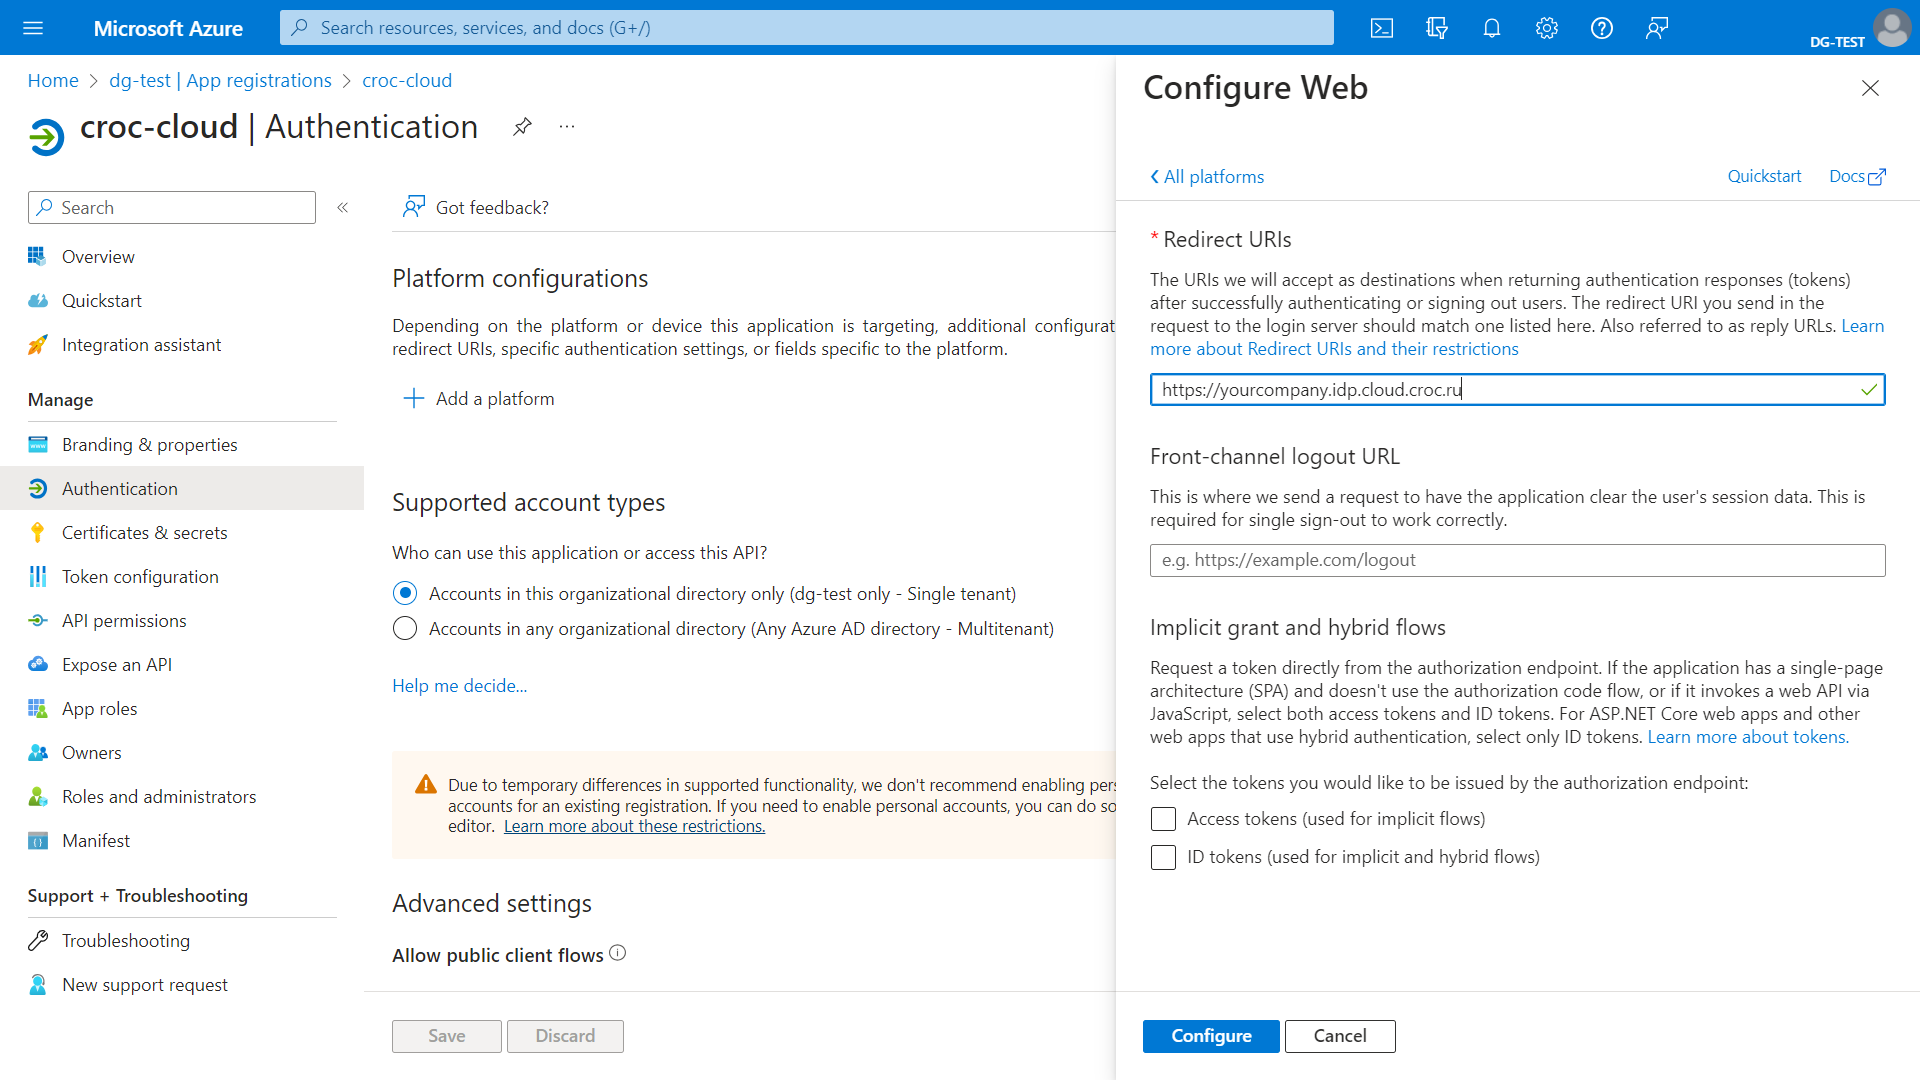
The application needs to “know” a NGN Cloud console entry point. To set it, go to the Authentication section and click Add platform. In the window that opens, select the Web card and, in the Redirect URI field, enter the link to the entry point that was generated when creating the provider in NGN Cloud (https://<name>.idp.cloud.ngn.com.tr). Click Configure.
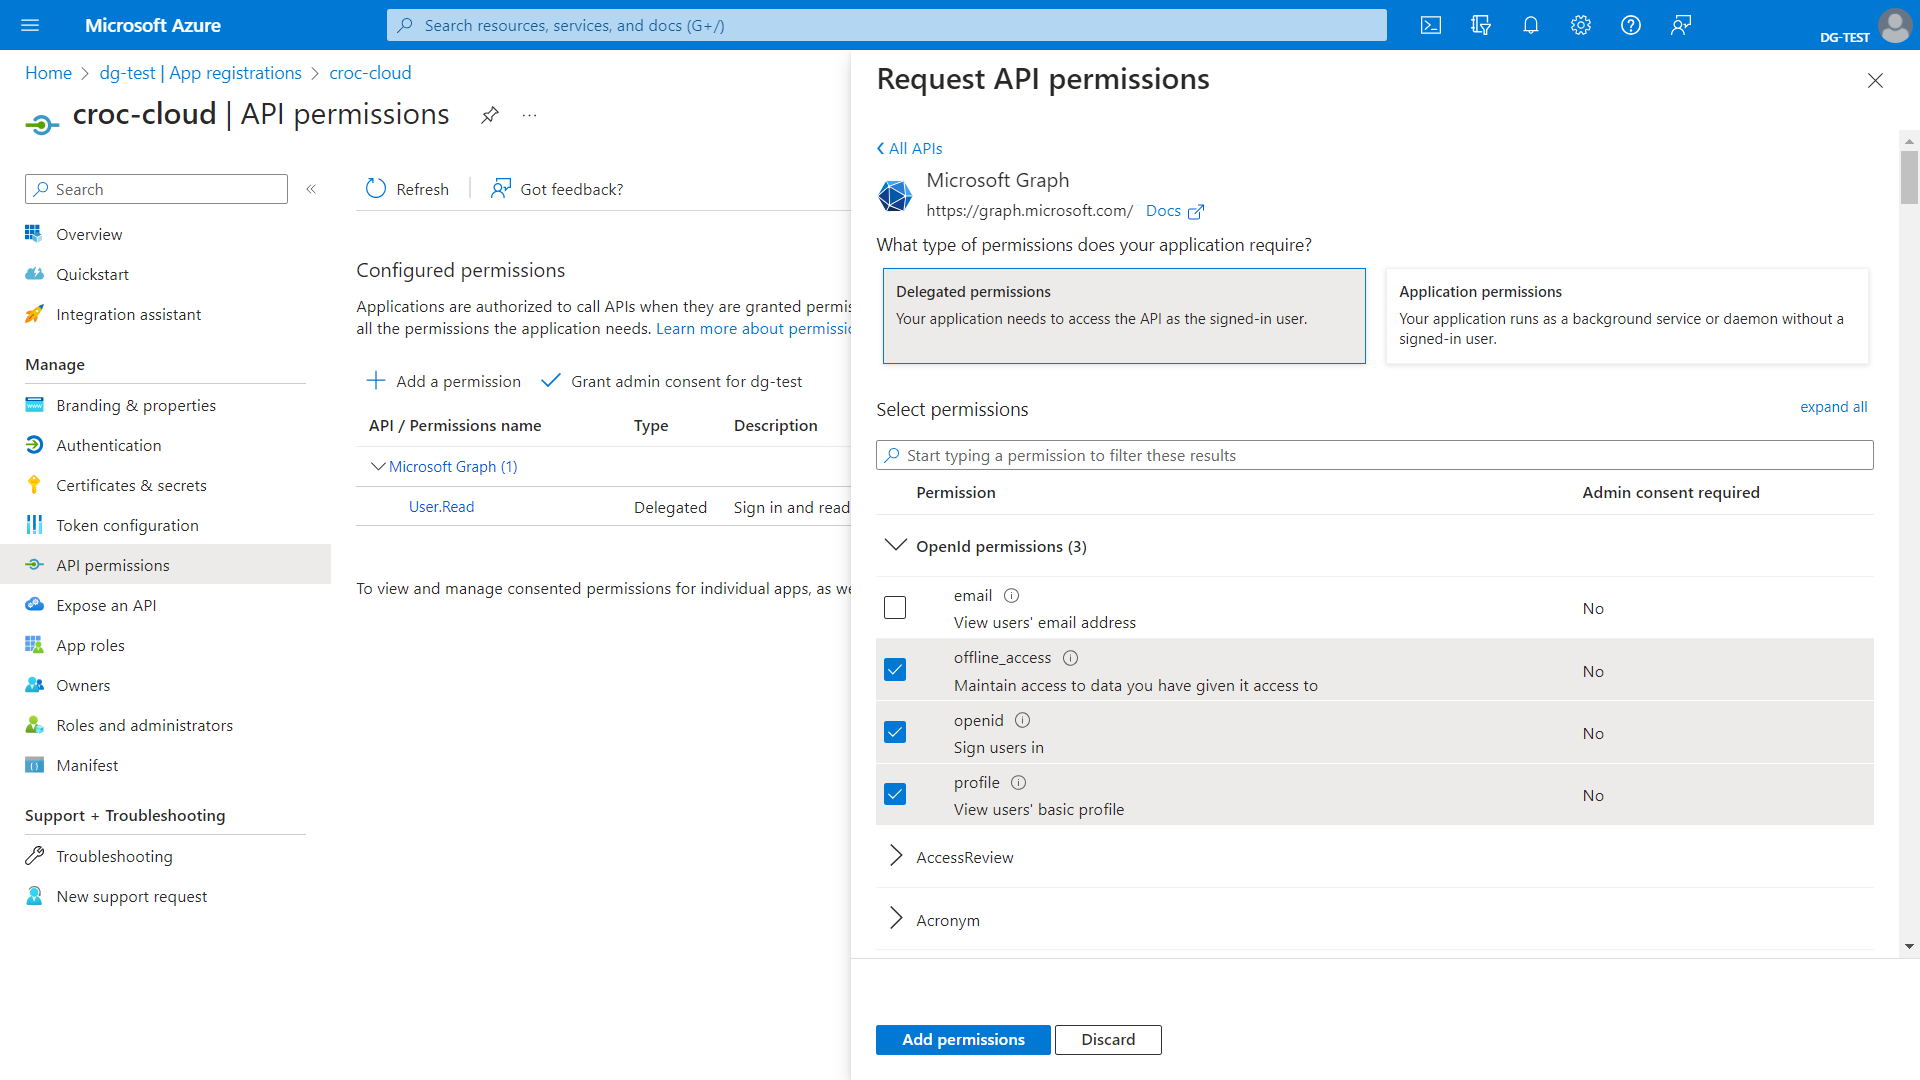
Set API permissions. To do this, go to the API Permissions section and click Add a permission. Go to the Microsoft Graph card and then open the Delegated permissions card. Enable the following permissions for OpenId: offline_access, openid, and profile. Click Add permissions to save them.
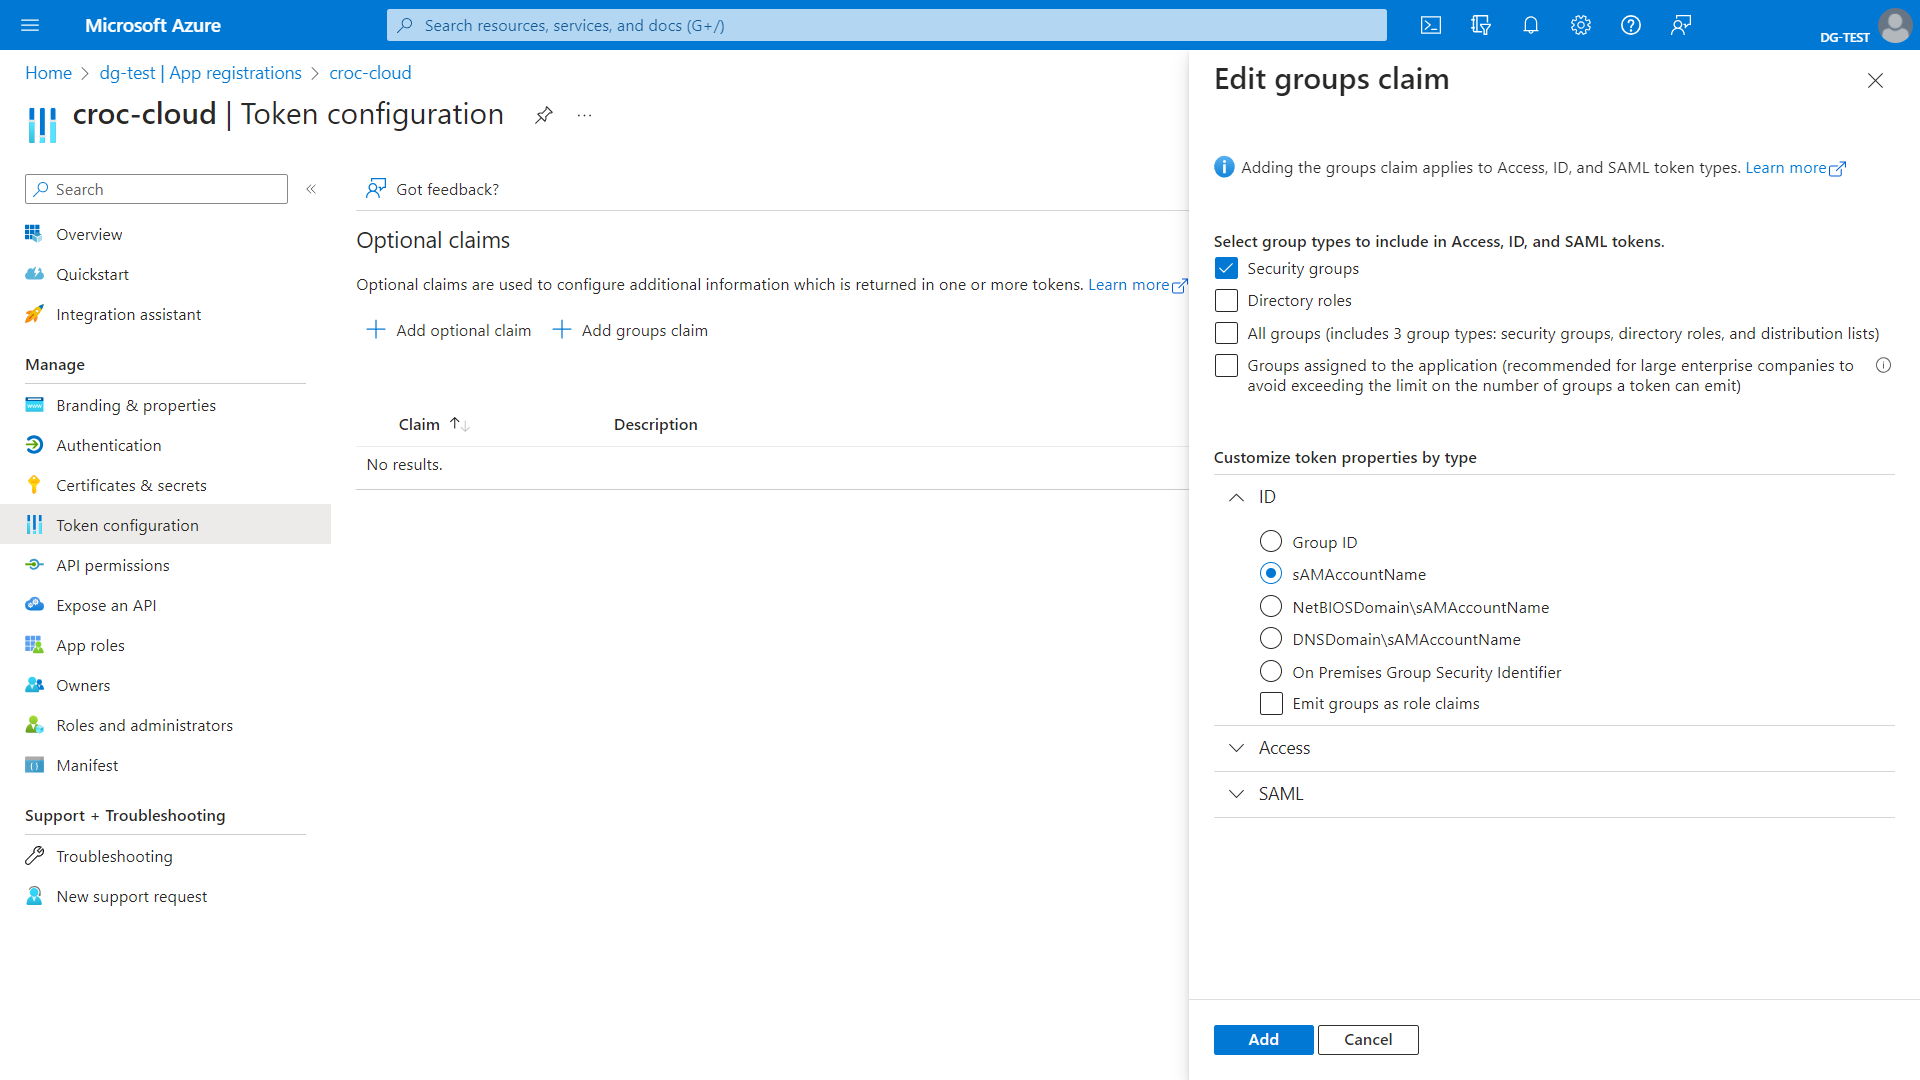
Then, configure Claims. To do this, go to the Token Configuration section and click Add group claims. On the page that opens, in the Select group types to include in Access, ID, and SAML tokens block, select Security Groups. In the Customize token properties by type block, select sAMAccountName as the ID type.
Note
The sAMAccountName ID is only available to synchronized Windows Server Active Directory users, otherwise a Group ID will be sent. For details about configuring group properties, see Microsoft documentation.
Click Add to save parameters.
Configure integration point in Keycloak#
To use Keycloak as an identity provider for NGN Cloud, configure the respective client connection.
Configure OpenID Connect client in Keycloak#
Create a client with the OpenID Connect type first.
In Keycloak admin console, select necessary Realm.
In the menu section Manage, select Clients and click Create client.
In the General Settings step, select
OpenID Connectas Client Type and specify the client name in the Client ID field. To advance to the next step, click Next.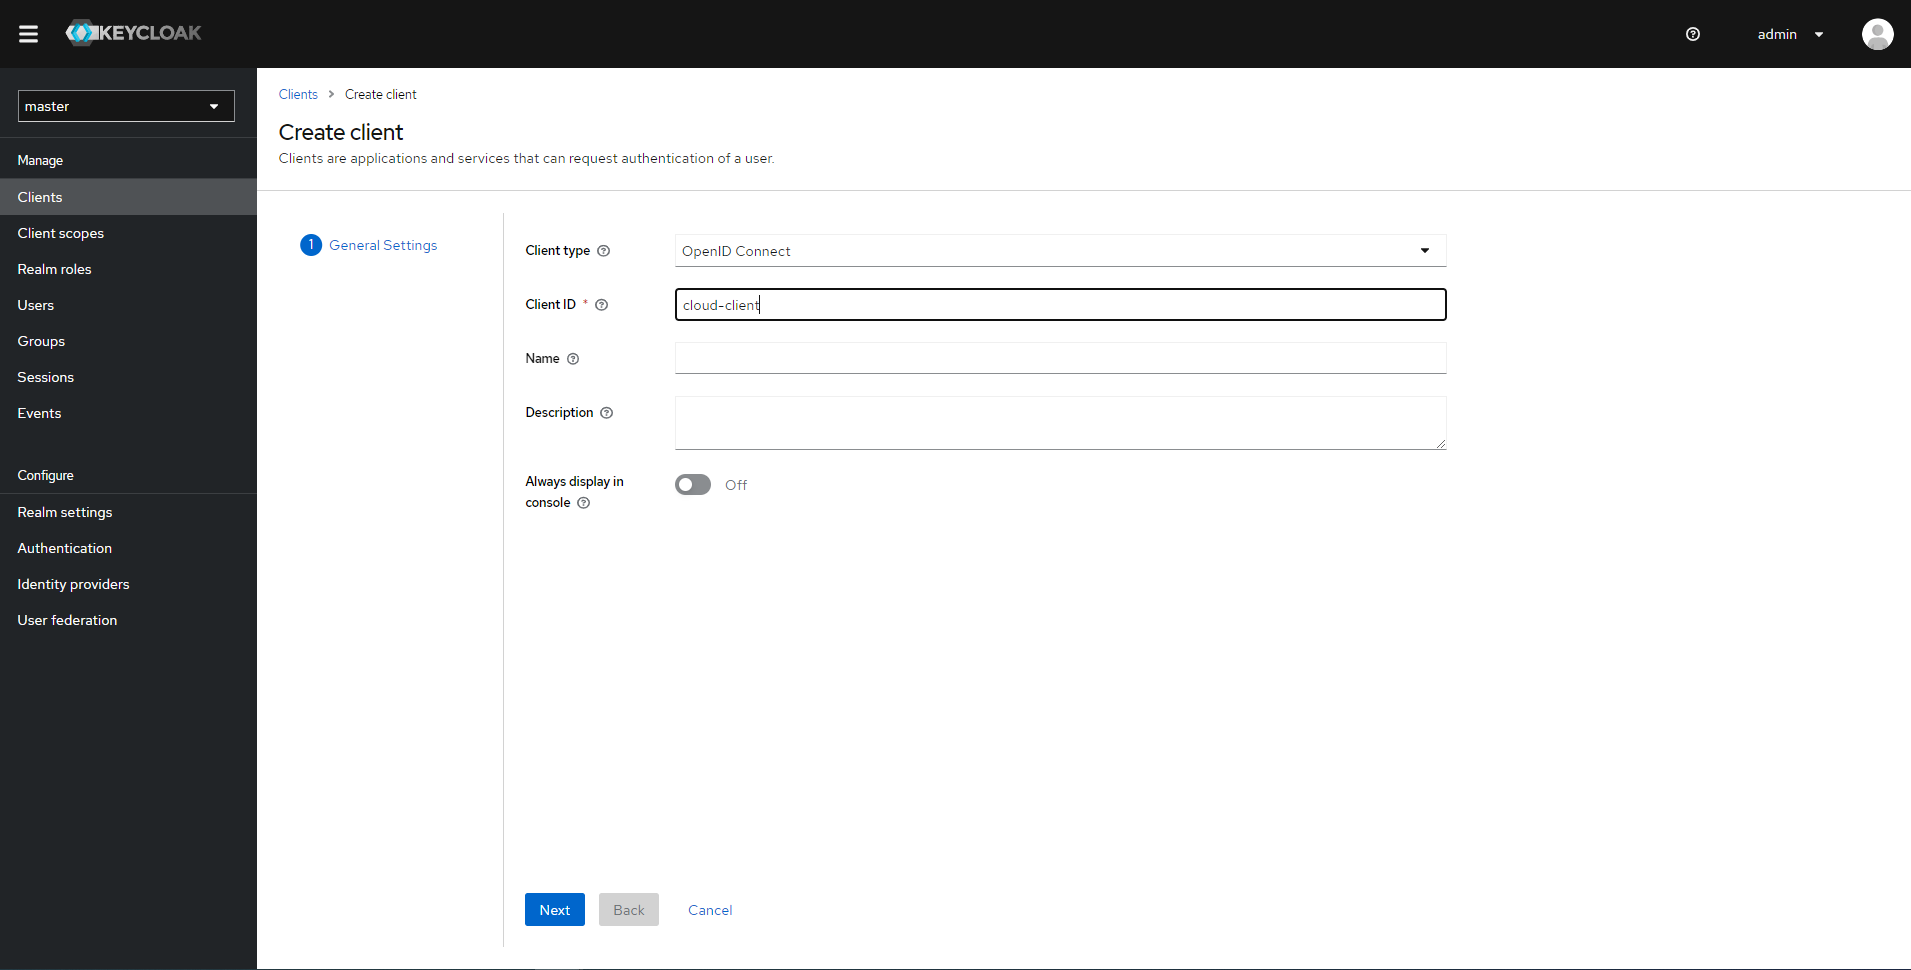
In the Configuration Options step, enable Client Authentication and check that Authentication flow is set to Standard flow.
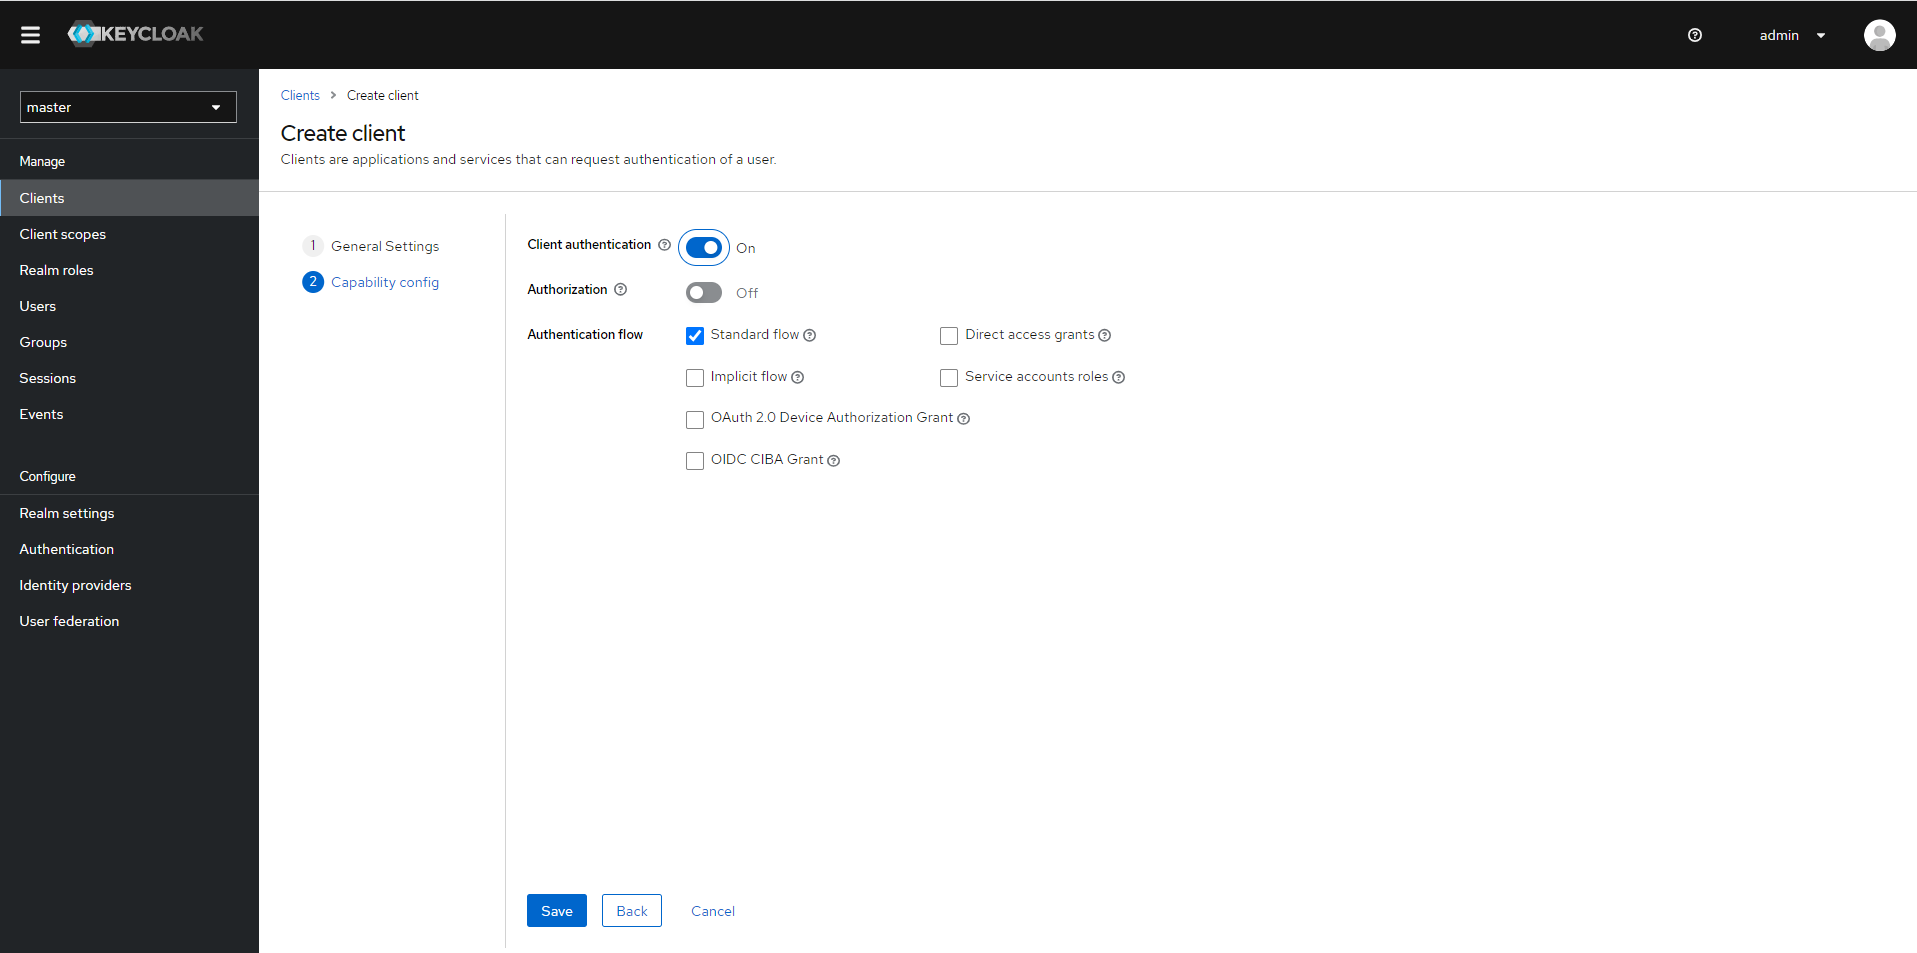
To create a client, click Save.
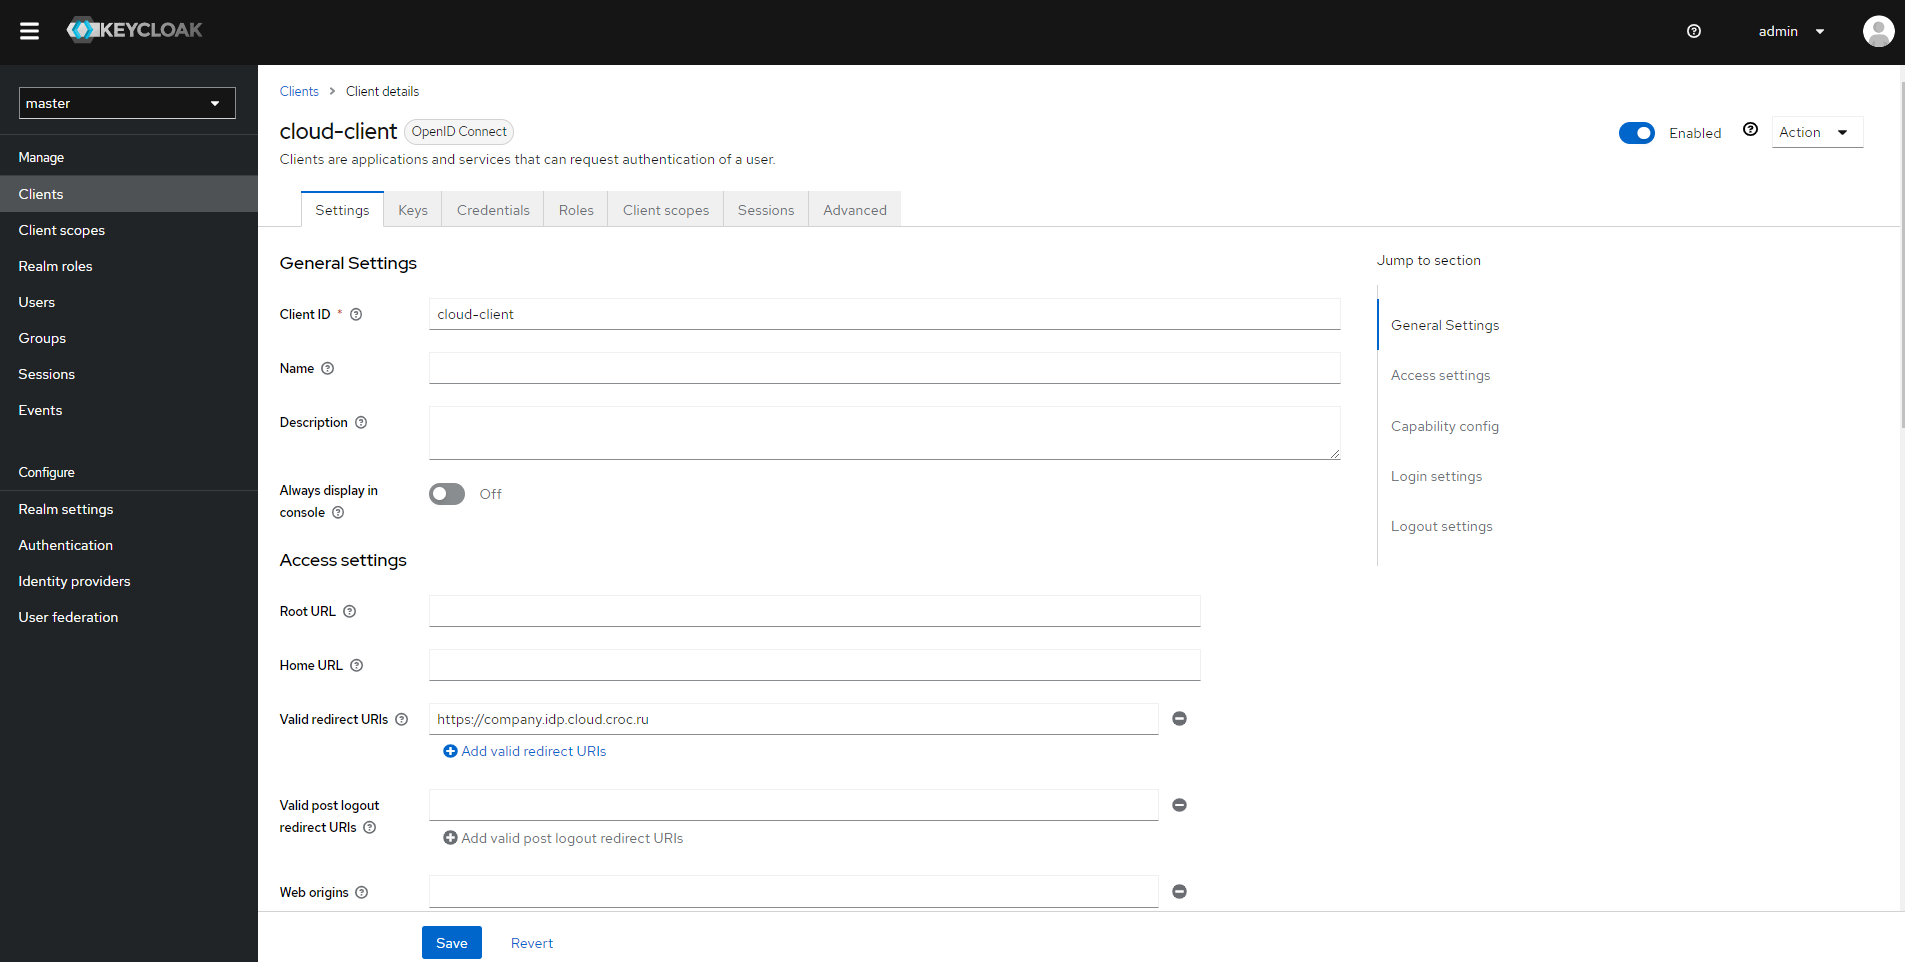
Next, specify the cloud entry point for the client you created:
In the Clients List of the Clients section, select the created client and open its Client details.
In the Settings tab, find the Valid Redirect URI field and enter the https://<name>.idp.cloud.ngn.com.tr address, where <name> is the name of the provider in NGN Cloud.
In addition, you will need the following information to set up an integration point in the cloud:
Client secret. You can find it in the Credentials tab on the Client Details page.
Endpoint addresses. You can view the endpoint configuration by clicking the OpenID Endpoint Configuration link in the General tab on the used Realm page in the Realm settings section.
Set up Claims#
Claims in Keycloak can be configured in many ways, one of which is briefly described below.
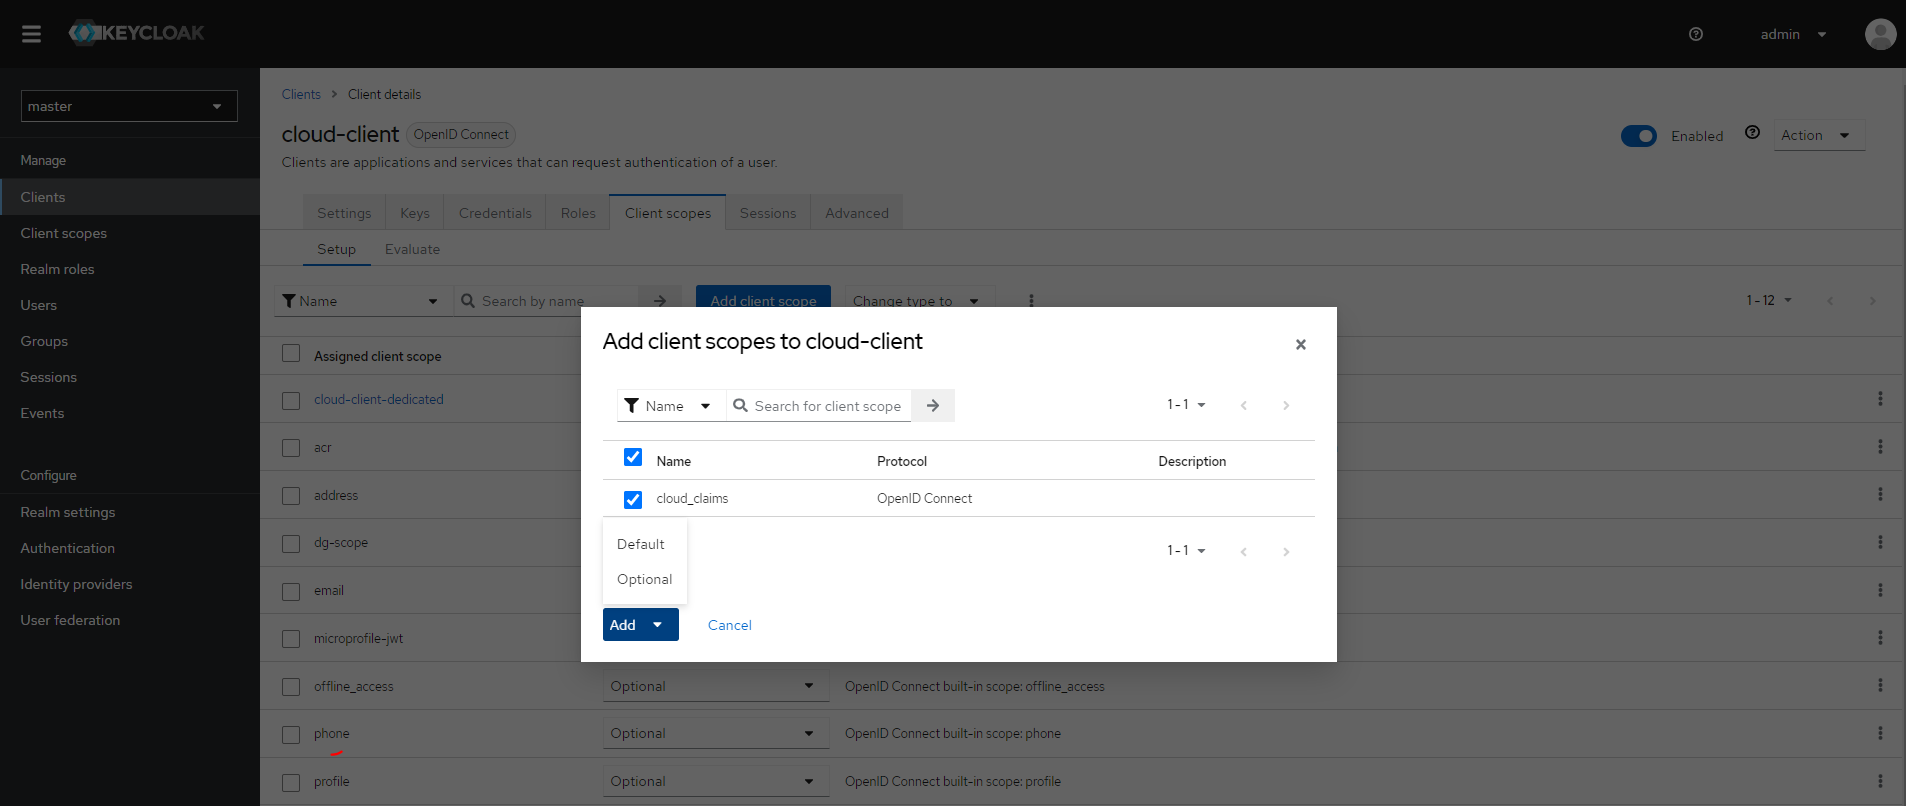
In the Client scopes section, create a new or select an existing context that you want to use for the client.
After selecting the desired context, go to the Mappers tab and click Configure a new mapper for a new client or Add mapper and By configuration for an existing one.
To set the upn claim, select, for example, User Attribute. In the Name field, specify an arbitrary name for mapper, and in the User Attribute field, the name of the attribute from which the user ID will be retrieved, for example, login. In the Token Claim Name field, enter
upn.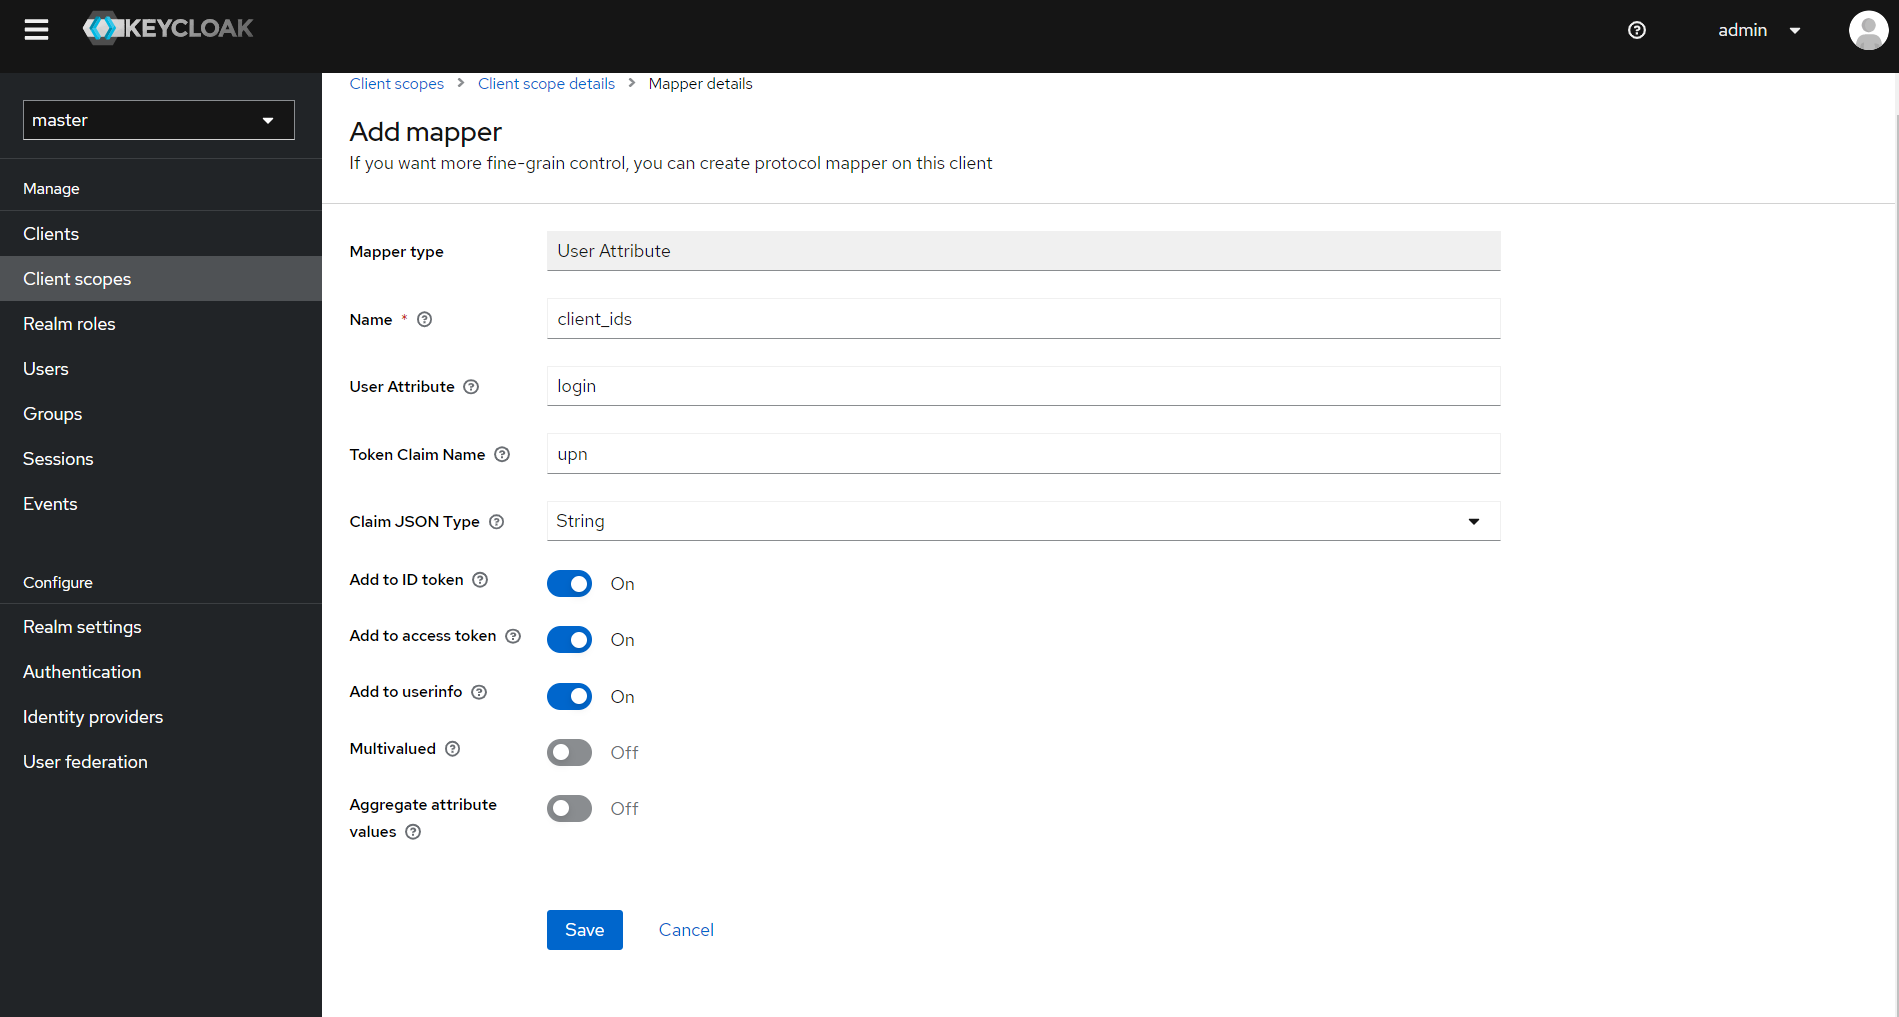
To set the group claim, select Group Membership. In the Name field, enter an arbitrary name for mapper, and in the Token Claim Name field, enter
group.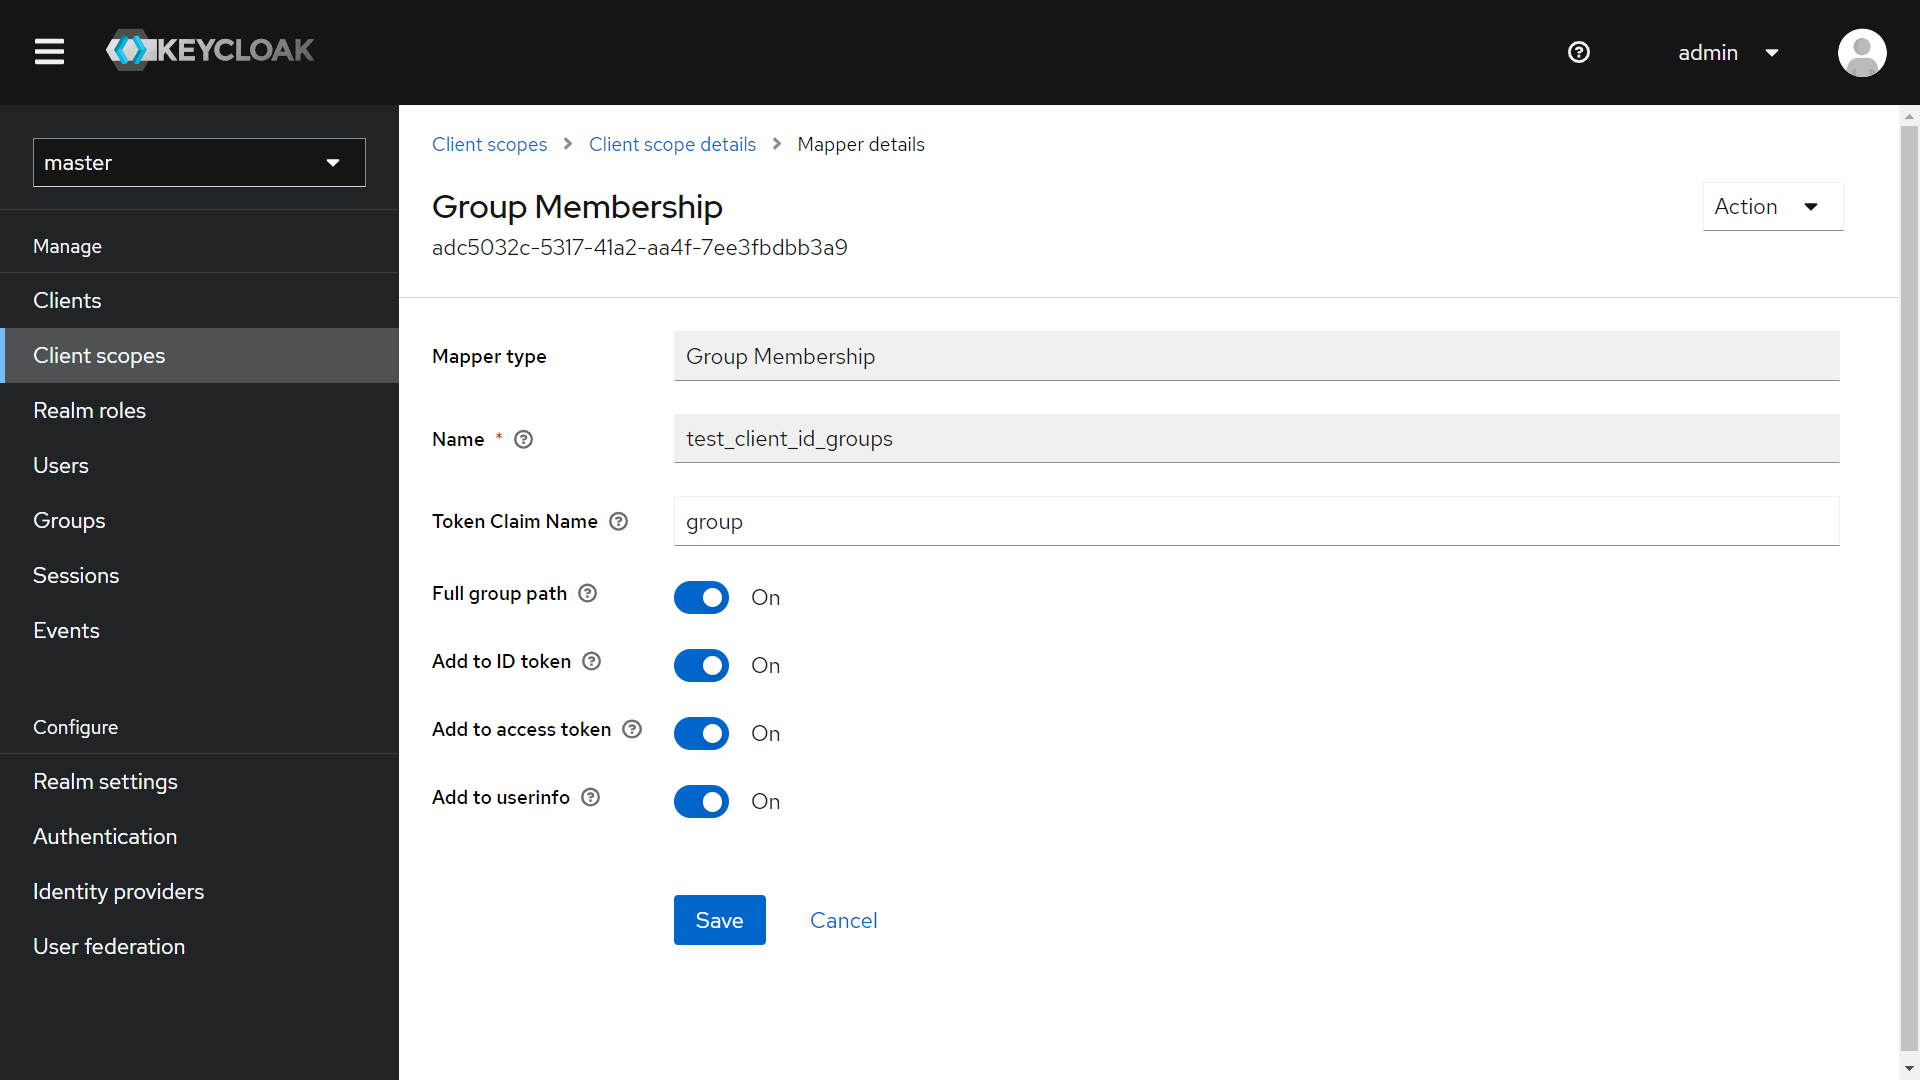
Assign the created context to your client if it has not been assigned to it yet. To apply the context, select the Default option when adding it.
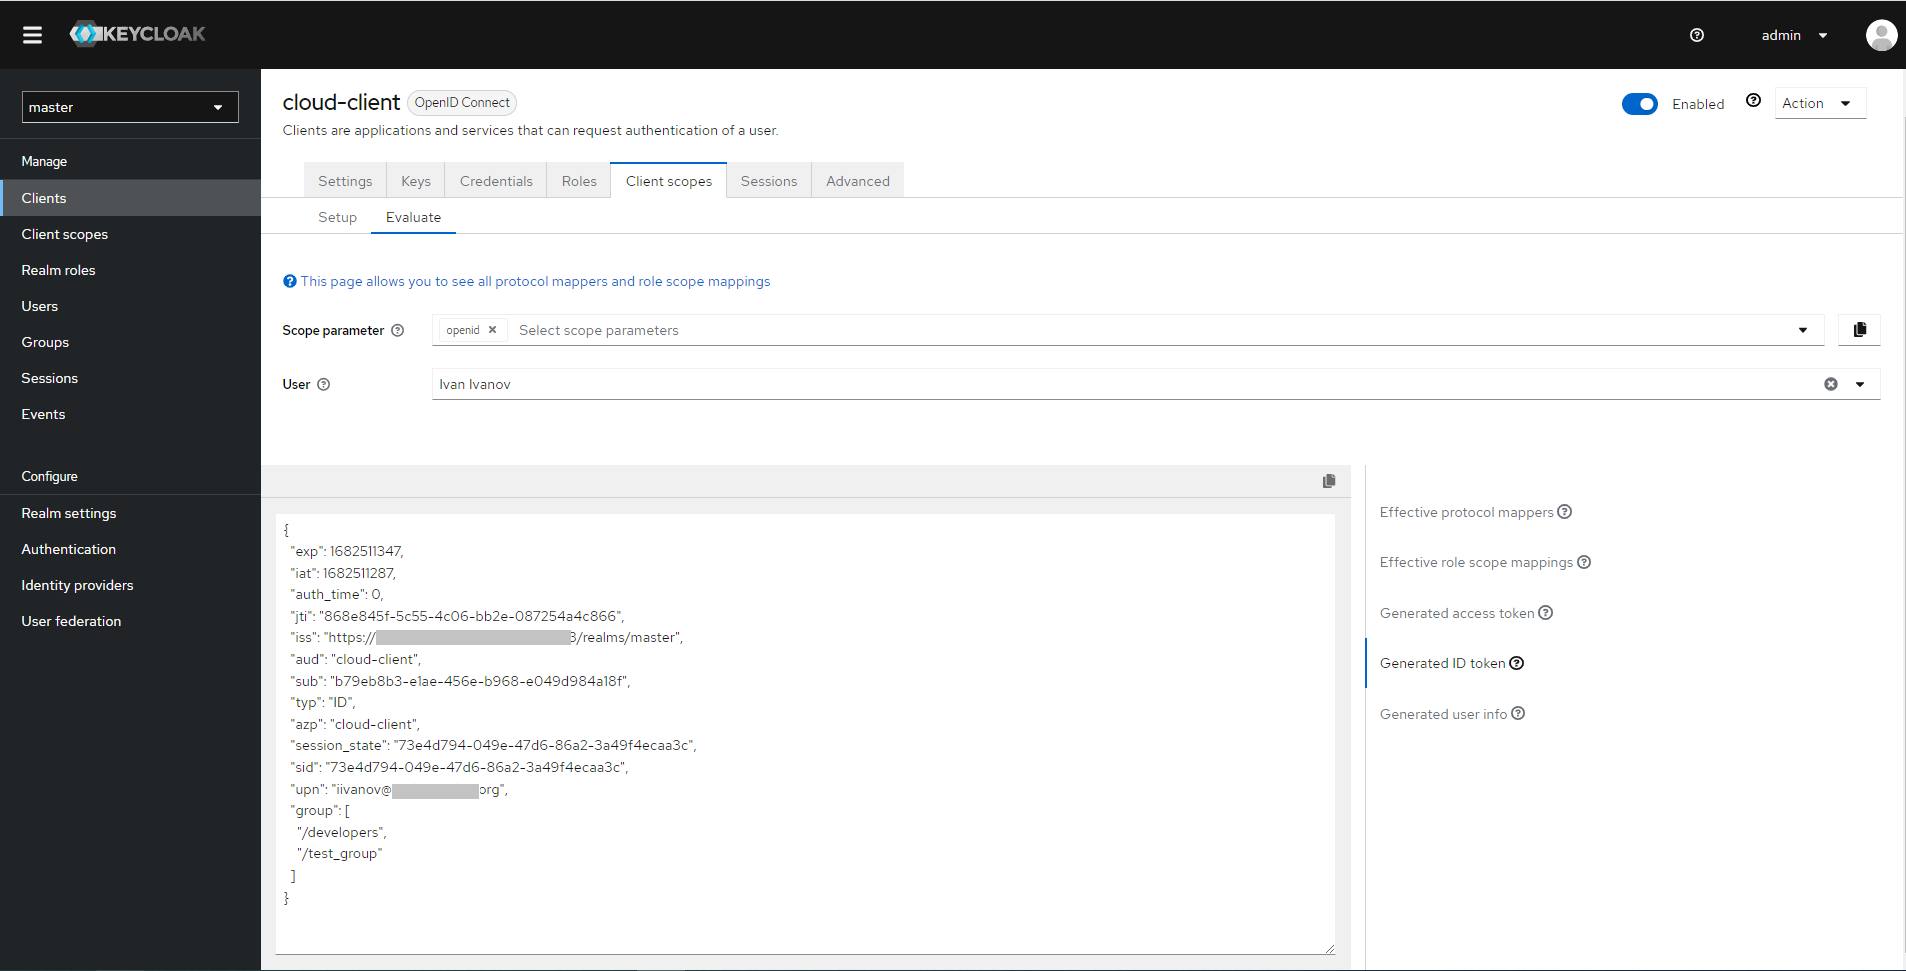
To check which user claims will be passed to the cloud:
Open Client scopes on the Clients details page of your client.
Go to the Evaluate tab and enter your username in the User field.
Click Generated ID token in the right menu to view the generated token.
Attention
When creating groups in the cloud, their names must be specified exactly as they are passed in the token, i.e. in this example /developers and /test_group.